So Sweet: Michigan Maple Syrup

            Early spring is sweet in Southwest Michigan when the sap rises ready to be harvested and turned into sticky sugary and wonderful maple syrup.

           Surprisingly, there are many maple syrup producers in Southwest Michigan, some who market their syrup throughout the state and beyond and others who are known locally and sell just as long as their supplies last.

           Denise Klopfenstein of Galien, Michigan comes from a long line of family members who make maple syrup and she’s long listened to stories about how her grandparents’ sugar shack was destroyed in a tornado back in the 1940s. But she never had plans on producing syrup herself. That is, until, worried that her son Tyler, who was 12 at the time, didn’t take enough interest in outdoor activities, she decided to turn to her family traditions into a way of motivating him.

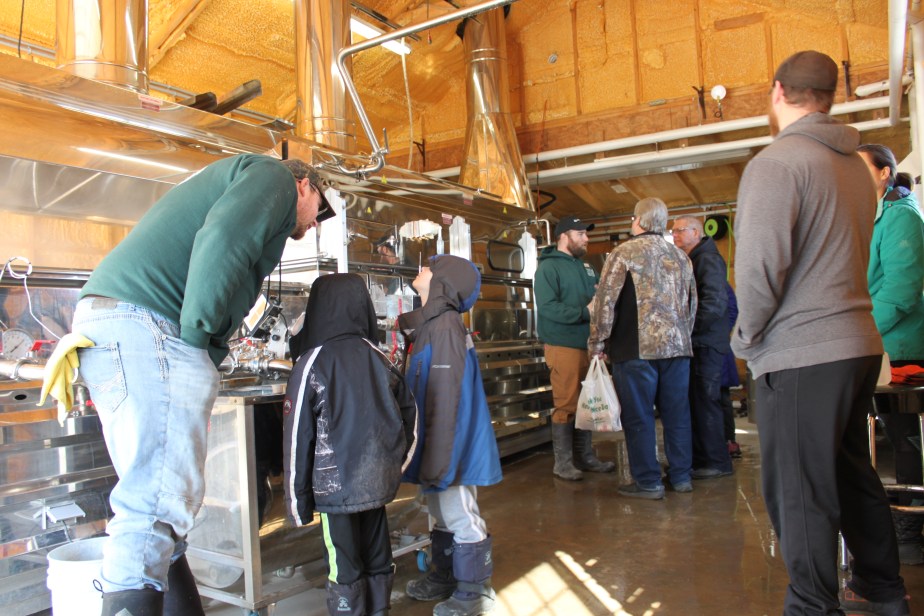
            “I knew he liked business and he liked money,” says Klopfenstein who invested in some rudimentary syrup processing equipment and designed a sugar shack–the term for the building where the sap is cooked down into syrup, naming the business Ty-Kat Sugar Shack.

Maple Bourbon Chicken Wings
Weber’s Ultimate Grilling by Jamie Purviance

            Relying upon mentors like Don Dodd of Niles who has been making syrup for years, the Klopfensteins have increased their yield and upgraded their equipment several times over the last few years.

            “Tyler’s always working at it–he spent his own money this year, money he’d made from making maple syrup to buy an even larger evaporator,” says his mom.

            “I’m hoping for a nine-week season this year,” says Rachel Ridley, who with her husband Brian, owns Ridley Family Sugar Farm in South Haven. “The sap is in the trees all the time but it’s only accessible to us at certain times. You need freezing nights and warm days for the sap to rise. Last year we only had six weeks of production because of the weather but this year seems more like 2014 we hope.”

            Not only do the Ridleys produce pure maple syrup, they also work with other local farmers to create about 14 or so specialty syrups using fruits such as dewberry, apple, pear, peach, blackberry, plum, cherry, black walnut and blackberry.

            “Everyone likes maple syrup on their pancakes,” says Ridley, “but products like our apple and pear syrup is good as a meat marinade.

Also going beyond just maple syrup, Christy and Bryan Olson, owners of Maple Row Sugarhouse in Jones, Michigan, create a variety of maple syrups infused with blueberry, raspberry, cinnamon and coffer among their other specialty syrups.

            “We also make other products such as our Maple Cajun Seasoning which has our maple sugar in it as well as such spices as cayenne, paprika, garlic and onion which you can use as a rub or in soup,” says Olson. “I make maple candies, maple hot sauce, maple garlic seasoning, maple barbecue sauce and maple cream which has the consistency of peanut butter and is good as an apple dip. And this year I’m partnering with a chocolate maker and making both dark and milk maple cream chocolates.”

            Olson says they have over 10,000 taps (the spikes that are used to drain sap from the trees) and produce 3000 to 4000 gallons of syrup each year from about 100,000 gallons of sap.

            “40 gallons of sap make about one gallon of syrup,” says Olson, noting that Michigan State University is doing research on the trees they tap. “Towards the end of the season it can take about 100 gallons of sap for one gallon of syrup. The content of sugar in sap is about 1% to 3% and if it’s below the 1% mark, that about when you’re done for the year.”

            The Olsons also host an annual maple syrup festival at their farm.

            John Newell, owner of Primal Woods in Hartford, says he and his wife Geri, started tapping trees as a hobby in the spring of 2014 for their own use.

            “We got our first evaporator two years later and ran that one for two years and then scaled up to 750 taps,” he says. “Now we’re making about 150 gallons, 16 half-pint bottles of every gallon and about 2400 bottles.”

            Describing what they’re doing as small to mid-size, Newell says that in Vermont, guys go out and tap 70,000 trees.

            “To do that, they’re using industrial equipment, which gets the people out of the whole process,” he says. “We’re not about that. We’re still using buckets, we’re never going to tubes, it makes the woods look like an extensive care unit.”

            Newell isn’t a fan of reverse osmosis either. That’s the process many maple syrup gatherers use to filter out the water in the sap to limit the time it takes to cook the sap down into syrup.

            “Maple sap is usually 2% sugar,” he says. “With reverse osmosis, it’s eight ounces. But using it changes the color of the syrup and the flavor typically goes with the color. There are four colors—golden, amber, dark and very dark and the darkest has the most flavor. I guess overall, we’re still doing it the old fashioned way. My analogy is we live in a deep maple sugar forest and the taste of the syrup reflects the biodiversity of the forest.”

            About five years ago, John Muellen, who lives on 40 acres in Baroda, ten of which are tillable and the other 30 woodland, was feeling kind of bored so he started off tapping maple trees and cooking the sap down in roasting pans suspended over cement blocks on a log burning fire. Getting into the process even more, he made a boiler out of a fuel oil tank, lit a fire inside and set buffet pans the flames.

            “I was constantly improving,” says Muellen, owner of Mulln-Heim Vineyards. “Last year, I came across a reverse osmosis machine from a brewery and modified it to use for making syrup. It’s all part of wanting to make money from the forest in a way that’s not harmful to the environment. Because that’s the way it’s supposed to be.”

Maple Row Sugarhouse

12646 Born St.

Jones, MI

(269) 816-4838; maplerowsugarhouse.com

Mulln-Heim Vineyard

522 E. Shawnee Road

Baroda, Michigan

(269) 932-8180; mulln-heim-vineyards.business.site

Primal Woods

(269)222-0101; primalwoods.com

Ridley Family Sugar Farm

743 70th St.

South Haven, MI

(269) 206-2135; ridleyfamilysugarfarm.com

Ty-Kat Sugar Shack

19465 Cleveland Ave.

Galien MI

(269) 357-3539

Maple-Roasted Root Vegetables

Maple sugaring time comes just about when the root cellar is nearly empty. Oven roasting concentrates vegetable flavors and the syrup pulls it all together. Roast a chicken and there’s dinner. The house-apartment-condo will smell wonderful.

3 medium carrots, peeled and cut into 1 1/4-inch chunks

3 medium parsnips, peeled and cut into 1 1/4-inch chunks

1 small (1/2-pound) yellow turnip, peeled and cut into 1 1/4-inch chunks

4 tablespoons butter

1/2 cup maple syrup

1/4 cup bourbon or rum

1 1/2 teaspoons kosher salt

Freshly ground black pepper

Preheat oven to 350 degrees. Arrange the carrots, parsnips and turnips in a single layer in a shallow roasting pan.

Heat the butter and maple syrup in a small saucepan just until the butter is melted, about 2 minutes. Remove from heat. Stir in the rum.

Pour the maple mixture over the vegetables and toss to coat. Sprinkle the vegetables with salt and pepper to taste.

Cover the pan with aluminum foil and bake for 25 minutes. Remove the pan from the oven, stir the vegetables and bake, uncovered, until tender, 20 to 25 minutes longer.

Maple Sour Cream Bran Muffins

This ab-fab recipe took first prize in the 1999 recipe contest sponsored by the Wisconsin Maple Syrup Producers Association.

1 cup flour

1 teaspoon baking soda

Pinch salt

1 cup bran flakes

1/3 cup raisins

1/2 cup chopped walnuts

1 cup pure maple syrup

1 cup sour cream

2 large eggs

For the topping

3 tablespoons flour

2 tablespoons brown sugar

1 tablespoon butter

Preheat the oven to 400 degrees. Grease a 12-cup muffin tin and set aside.

Sift the flour, baking soda and salt into a medium-size bowl. Add the bran flakes, raisins and walnuts.

Combine the maple syrup, sour cream and eggs in a small bowl. Add them all at once to the dry ingredients and stir until just blended. Using a 1/3- or 1/2-cup measure, fill the muffin cups three-quarters full with the mixture.

For the topping

Combine the flour and sugar in a small bowl. Cut in the butter until the mixture is crumbly. Sprinkle the topping on the batter in the cups.

Bake for 15 to 20 minutes, or until the muffins are golden brown. Makes 12.

The above two recipes are from The Maple Syrup Cookbook by Ken Haedrich (Storey Press).

Maple Bourbon Chicken Wings

Here, you brown the wings first over direct heat without any sauce. That’s when the skin gets

crispy. Then you move the wings over indirect heat, where it is safe to layer on the sweet sauce

without the threat of it scorching.

12 large chicken wings, about 3 pounds total

Extra virgin olive oil

RUB

1 teaspoon kosher salt

1 teaspoon dried oregano

1/2 teaspoon ground cumin

1/2 teaspoon chipotle chile powder

1/4 teaspoon ground black pepper

SAUCE

3/4 cup ketchup

1/4 cup maple syrup

1/4 cup bourbon

2 tablespoons cider vinegar

1/4 teaspoon chipotle chile powder

The chicken wing is made up of three sections: the drumette (attached to the chicken body), the wingette (or flat; the middle section), and the tip. Each section has a bone ball socket, or joint. Flex each section to find the joint.  Using the tip of a boning knife, and keeping the joint extended to expose the socket, cut through the ball socket connecting the drumette and wingette and then through the socket connecting the wingette and tip. Discard the wing tips or save for stock (they tend to burn on the grill).

Brush the chicken wings very lightly with oil. In a small bowl mix together all the rub ingredients, then season the wings evenly with the rub. Set aside at room temperature while you prepare the grill. Prepare the grill for direct cooking and indirect cooking over medium heat (350° to 450°F).

In a small saucepan, combine all the sauce ingredients. Bring to a boil over high heat on the stove, then reduce the heat to a simmer and cook for 12 to 15 minutes, stirring occasionally. Remove from the heat and set aside.

Brush the cooking grates clean. Grill the chicken wings and drumettes over direct medium heat, with the lid closed as much as possible, for 10 minutes, turning once or twice and watching closely for flare-ups that could scorch the skin.

Brush the chicken pieces with sauce on all sides and move them over indirect medium heat. Continue to cook, with the lid closed as much as possible, until the meat is no longer pink at the bone, 10 to 15 minutes. During this time, stay vigilant, as the sugars in the sauce could burn. Remove from the grill and serve warm.

The above recipe is excerpted from Weber’s Ultimate Grilling by Jamie Purviance. Reproduced by permission of Houghton Mifflin Harcourt.

Saffron, Maple, and Vanilla Kefir Milk Fizz


Saffron, Maple, and Vanilla Kefir Milk Fizz
From Ferment by Holly Davis with permission by Chronicle Books

Fizzy milk is an acquired taste, but once acquired you will likely want more. And this flavor combination transforms milk into something quite special. I tend to drink kefir plain and at room temperature throughout winter, but when summer comes, I serve it chilled and fizzing.

Small pinch saffron threads

1 3⁄4 ounces boiling water

21 ounces ripe kefir

1 tablespoon maple syrup

1 vanilla bean, split lengthwise

Combine the saffron and boiling water in a 4-cup jug and let it steep until cooled.

Once cooled, pour in the ripe kefir. Add the maple syrup and stir well. Put the vanilla bean in a clean 3 cup swing-top bottle, then pour in the kefir mixture (use a funnel to do this if you have one).

Close the lid and leave the bottle out at room temperature for 1 day, then open the bottle to release excess pressure and place it in the fridge. Ready in approximately 1–3 days

It will keep in the fridge for up to 5 days, but make sure to open (burp) the bottle once a day to prevent over‑carbonation.

Reprinted from Ferment by Holly Davis with permission by Chronicle Books

King of Heirloom Apples

         We take the concept of heirloom or heritage fruits and vegetables as common place nowadays. But I was reminded how unfamiliar the concept was just several decades ago and how Herb Teichman, the owner of Tree-Mendus Fruit Farm in Eau Claire, Michigan who passed away earlier this month at the age of 88, was in the vanguard of re-introducing the fruits long ago to the American palate creating a connection to food heritage.

         I met Herb about 20 year ago and over the years wrote about his family and farm many times. After reading about his passing, I thought I would re-read them. Here’s the first few paragraphs of one of the first articles about Herb I wrote.

“For most of us, Louis XIII is a hazy figure, a bewigged monarch who lived some 350 years ago and had a furniture style named after him.

But for Herb Teichman, owner of, Louis is but an apple away.  Apples are historical embodiments for Teichman   who can tell you the history of each heritage apple variety he grows.  Take the Calville Blanc D’hiver, a favorite of Louis XIII.

         “This was the classic dessert apple of France,” says Teichman. “Le Lectier, who was the procurer for Louis XIII, grew it in the King’s gardens at Orleans. When I taste a Calville Blanc, I began to feel like I know Louis the 13th a little better.  Eating these apples becomes a bridge connecting the centuries.”

         “Or take the Newtown Pippin, a favorite of both Ben Franklin and George Washington.

          “When I bite into a Newtown Pippin, it’s like I’m sharing something with Washington or Franklin,” says the (then) 72 year old Teichman.

         “Teichman, a successful second generation fruit farmer (his parents first started farming here in the 1920s), designates three of his 500 acres of fruit trees to raising heritage apples.  Heritage (or antique or heirloom) is a term applying to varieties that have existed for 75 years or more.

          “According to Teichman, an apple tree lives about 20 years so for these heritage varieties to still exist after all these years means that generations of men and women believed that the fruit was so good it was worth reproducing by grafting over and over again through the centuries. 

          Teichman is one of the few heritage fruit growers in the United States.  And, as if that isn’t enough to discourage people, Teichman says that there are few antique apple growers in the United States because antique apples aren’t as commercially viable as the modern apples. Heritage apples, which are more expensive than modern varieties– aren’t always pretty—they tend to be much smaller than the varieties found in stores, are often knobby and discolored.  But what they lack in looks, they make up for in flavor.   

         “Years ago, if an apple like Margil or Pitmaston Pineapple, which tastes like a pineapple, was growing in your yard, you possessed the best darn thing there is in the world,” says Teichman who speaks in superlatives when talking of apples.  “They didn’t have candy bars; a good apple was dessert.” 

         Talking to Teichman is like getting a lesson in food history.    “Each apple variety has a history of where it originated, who liked to eat it and why,” he says.  “And each apple really tastes different. 

“Teichman says he moves a little closer in time to his hero Thomas Jefferson when he bites into an Esopus Spitzenberg apple.  Jefferson so loved this variety of apple that after returning from serving an ambassadorship in France, he planted 12 Esopus Spitzenberg trees at Monticello.”

Soon Martha Stewart discovered Teichman and featured a story about the heritage fruit at Tree-mendus. Makers of brandies and cordials wanted his heirlooms fruits to create old world flavors. Now the farm has more than 200 varieties of heritage apples.

Herb Teichman

And, of course, heirloom fruits and vegetables are much more common. According to the National Restaurant Association’s heirloom vegetables and fruit will continue to be one of the top food trends in the area of produce as it has been in the last few years. For that, we owe a big thank you to Herb.

One of the times I visit the fruit farm, Herb gave me a copy of Tree-Mendus Fruit Farm Family Presents Recipes and Collections which I’ve kept all these years. I thought it would be fitting to include an apple recipe from the book.

Elizabeth Teichman’s Brandied Apple Roll-ups

24 roll-ups

¼ cup sugar

1 cup chunky applesauce

¼ teaspoon cinnamon

1 tablespoon cornstarch

¼ cup brandy

1 tablespoon sugar

In small saucepan, combine the ¼ cup sugar and cornstarch. Stir in applesauce and brandy. Cook and stir over medium heat until mixture is thickened and bubbly. Remove from heat.

Make crepes (recipe below).

On each mini-crepe, spoon one scant tablespoon of the filling along one edge of the unbrowned side. Roll up tightly. Place seam side down in greased shallow baking pan.

Mini-Crepes

3 egg yolks

½ cup milk

3 tablespoons margarine, melted

¼ teaspoon vanilla

½ cup flour

¼ cup sugar

3 3gg whites

In bowl, beat together egg yolks, milk, margarine, flour and sugar. Beat egg whites at high speed until stiff peaks form, gently fold batter mixture into beaten eggs white.

Heat lightly greased 6-inch skillet. Remove from heat, spoon in one scant tablespoon of batter, spread batter with back of spoon into 4-inch circle. Cook over medium heat for 30 to 60 seconds. Place on paper towel. Repeat with rest of the batter.

To freeze: Make stack, place wax paper between each crepe, place in plastic bag. Freezes well for up to 4 months. Thaw for one hour before using.

Pizza City: Steve Dolinsky’s Homage to the Best Pizza Town in the U.S.

              Call it pizza love. In 2017, according to PMQ Pizza Magazine, Americans consumed 45.1 billion dollars’ worth of pies. But what’s the best place for pizza? Steve Dolinsky, a James Beard award winning food writer known as the “Hungry Hound,” podcaster and food tour operator, decided to prove there’s no better place for pizza than Chicago, its suburbs and five collar counties.

He shares his results in Pizza City, USA: 101 Reasons Why Chicago Is America’s Greatest Pizza Town (Northwestern University Press 2018; $24.95), a user-friendly guide to  all things dough, sauce and toppings divided into chapters on pizza categories:: Tavern-Style (Chicago-Style Thin), Thin, Artisan, Neapolitan, By-the-Slice (New York-Style), Deep-Dish and Pan, Stuffed, Sicilian, Roman and Detroit-Style and last, but not least, Overrated. Dolinsky than includes photos and information about each of the 101 places in the book as well as the five best in each category. Maps included show where the top pizza places are located in case you want to hit the road.

              It was a tough assignment and Dolinsky often ate pizza at three different places in a day. In all he visited 185 locations (not all made the cut), consumed massive doses of anti-acids, and, to keep his weight gain at a minimum, practiced portion control and doing yoga sculpting daily.

              Dolinsky’s inquisitiveness about Chicago food isn’t limited to pizza.  He’d already written “The 31 Essential Italian Beef Joints in Chicago(land): for his Website stevedolinsky.com and also visited every place in the city that served Vietnamese pho so he was used to massive samplings of the city’s favorite foods, but he had other reasons as well.

              “People say Chicago has the best pizza, but I didn’t really think that anyone had done any research on this scale, that there hadn’t been a deep dive into pizzas,” he says, noting that he considered it an unparalleled lifetime quest in the city’s illustration pizza history. “I didn’t realize how massive of an undertaking it would be.”

              Like any scientific study, there were rules. Dolinsky created what he called the Optimal Bite Ratio (QBR) with points given for crust, sauce and the quality of the sausage and pepperoni as well as the application and mouthfeel of the cheeses.

              Here’s just a smattering of what Dolinsky learned. While most of the U.S. prefers pepperoni as a topping, Chicago likes bulk sausage, which probably harkens back to the days of the stockyards. Media outside of Chicago often confuses deep crust pizza and stuffed pizza (the latter which Dolinsky mostly disdains). Deep crust pizza, while one of Chicago’s wonderful inventions, is rarer than one might think though outsiders think it’s the real Chicago thing. Notice how when you travel, a Chicago-style pizza place means deep dish. but Dolinsky says it’s the Tavern-Style or Chicago-Style Thin, square-cut pie that Chicagoans love—the kind with middle pieces in the center with no crust handles that my brother and I used to fight over when we were kids.

              For those who want the full-Dolinsky treatment, he also runs pizza walking tours starting in May. The tours meet at Lou Malnati’s (1235 W. Randolph St.), a 7-minute drive from The Loop and showcases four different styles of pizza. Highlights include a traditional Chicago deep-dish, an only-in-Chicago Roman al taglio, a classic Neapolitan and a Sicilian slice. Included in the tour price is a custom souvenir lanyard and badge good for discounts and deals. For more information, visit pizzacityusa.com

              If you can’t wait for a tour or to learn more, on Thursday, January 31 from 7:30-9:30 pm EST, Steve Dolinsky will be teaming up with the chefs from Pizzeria Bebu for a pizza–making demonstrated, followed by a tasting. Steve then will give a lively presentation on how he went about making the choices for the book.

Where: Read It & Eat, 2142 North Halsted St., Chicago, IL. For ticket prices and more information, (773) 661-6158; readitandeatstore.com

In the meantime, here’s a deep dish pizza recipe from Lou Malnati’s Pizzeria, rated among the top by Dolinsky and a favorite in Chicago for over 40 years.

The Malnati Classic

20 ounces pizza dough

Olive oil, for the pan

12 to 16 ounces mozzarella cheese, sliced

12 to 14 ounces 90-percent lean Italian sausage, casings removed

10 to 12 ounces seasoned Roma tomato sauce, maintaining chunks

2 to 3 ounces grated Parmesan

2 to 3 ounces grated Romano cheese

Special equipment: a round steel baking pan

Preheat the oven to 450 degrees F.

Allow about 20 ounces of your favorite yeast dough to rise. You may do this if you have a proofer, or simply leave it at room temp for about 2 hours.

Oil a round steel baking pan with a few ounces of olive oil. Press the dough on the bottom and to the sides of the pan, being careful not to tear it. Holes in the dough will create a soggy crust. Pull the dough up the sides of pan to 1 to 1 1/2 inches high.

Place the mozzarella evenly across the dough. Top with the sausage, making sure to get the sausage all the way to the sides.

Cover with the seasoned tomato sauce, spreading evenly and maintaining the chunks of tomatoes. Sprinkle with the Parmesan and then the Romano.

Bake until the crust and the grated cheese turn golden brown, and the crust is firm yet flaky, 30 to 40 minutes.

Recipe courtesy of Lou Malnati’s, Chicago, IL.

Lost Restaurant Recipes Found: Finally, the famous Mead Chicken Recipe!!

A popular restaurant, long out of business, was famous for their fried chicken. We finally have the recipe not only for their chicken but other favorites. Enjoy!

            In the years I’ve been writing about food for the Herald Palladium, the largest newspaper in Southwest Michigan, I’ve received many requests from readers for recipes but undoubtedly the most popular request has been for the fried chicken and Cole slaw recipes from Mead’s Chicken Nook,  a very popular eatery in Benton Harbor and St. Joseph from 1945 until the late 1980’s which was started by Pearl and Buster Mead.

            I was always told that the family never shared the recipes from the restaurant so I was surprised when I heard from Gina Lewis Schmaltz of Baroda suggesting I contact her brother Guy Lewis. A quick message to him on Facebook and within a week we met at Watermark Distillery in downtown Stevensville (Guy lives nearby) and I suddenly had a copy of the recipes and more family history in my hands. It was like striking gold.

            “It wasn’t that we wanted to keep these secret,” Lewis told me. “It’s just that I was afraid people wouldn’t believe me because the chicken recipe is so simple. I thought people would think we were keeping out a secret ingredient.”

            It is indeed a very simple recipe. An egg and milk batter, a little salt and flour. The steps are important, Guy told me. The chicken is salted right before it’s dipped.

            I told him that I was often surprised at how simple some recipes are. There’s a famous perch, chicken and frog leg place in Northwest Indiana where I grew up. It’s called Teibel’s Family Restaurant and has been in business in Schererville for 90 years. When I was given the recipe for their chicken, perch and frog legs, I was astounded it was so simple. Basically flour and some seasonings the same recipe the original Mrs. Tiebel had brought with her from Austria, her native country.  But like piano playing and other skills, the magic is in the cooking. We can all be given the same recipe or the same sheet of music, but how it comes out is often extremely different.

            Obviously the Mead family knew how to fry chicken. During Prohibition Buster Mead learned how to do so at the Allendale Resort in Branson, Missouri where he and his future wife, Pearl McClure, were from.

            “My grandparents moved from Branson  to Benton Harbor at the start of World War II because Buster assumed he would be drafted into military service and while he was gone Pearl could live with her parents, Daisy and Jim McClure,” Lewis says. “They lived in Stevensville and Jim worked at Emlong’s Nursery. They had also recently moved from Missouri. Buster took a job at Upton Machine company–now Whirlpool)–operating a machine which made parts for the war effort. In September 1945 they opened the first Chicken Nook at 297 East Main St. in Benton Harbor. In 1956 they moved to the newly built Chicken Nook at 1111 Main St. in St. Joseph. My first job was bussing tables there on weekends when I was about 15.”

            At its peak, a lot of chickens got fried at Mead’s. A 20 to 30-foot wall was line with fryers, all custom made as were the griddles with sides of about an inch to two inches high.

            “He’d pour oil in them to panfry some of the chicken,” he says. “The legs and wings went into the deep fryers.”

            Their poultry was delivered almost daily from Troyer’s in Goshen, Indiana—talk about fresh. As an aside, Troyer’s County Market, which opened in 1912, is still in business.

            “It came in big crates that were slid down the stairs to the basement. From afternoon to evening, the staff would be downstairs cutting up the chickens which came in whole,” says Guy. “They then went into a big tub of ice.”

Guy and Gina’s dad in the spotless kitchen at Mead’s Chicken Nook.

            Gina Lewis Schultz remembers working at Mead’s when they were located on Red Arrow Highway in Stevensville in what is now Lee’s Hunan.

            “I was in my teens,” she says. “I remember my dad taught me how to make Pearl’s Dressing two gallons at a time.”

            Her grandfather created most of the recipes on the menu including the dressing which he named after his wife. Schultz says she’s seen other recipes for it but the dressing served at the restaurant contained apple cider and what she calls “heavy mayonnaise” such as Hellman’s.

            “But no Miracle Whip,” she says emphatically.

            Schultz still makes the fried chicken about once a month or so for her husband using the originally recipe. When I mentioned that I had made it earlier in the evening and my kitchen looked like a disaster with egg dip, flour and oil scattered around, she said, “well, it is kind of messy,” though I felt, from the kindly tone of her voice, that it wasn’t a messy process when she did it.

            I asked Schultz what she remembers most about her time working there and she recalls how busy it was.

            “And there was constantly and constantly chicken being served or going out the door,” she says.

            In the early 60’s the Meads opened a second location at 325 W. Main St. Benton Harbor but it was only open for a few years.

            “That location has been the home of many other restaurants since then,” says Lewis. “In the late 70’s the Meads retired and sold the restaurant. Buster worked part time in the deli for Harry Zick at his Vineland Foodland on Vineland Road in St. Joseph Township. Eventually my grandfather  decided he wasn’t done in the restaurant business and opened his new Chicken Nook on  Red Arrow Highway.  They were in business there for just a couple of years then age finally caught up with them and they had to shut down the fryers for the last time. I worked there a few hours per week to help out and so learned some of Grandpa Meads recipes but also, even better, I got a lot of adult time with my grandfather.”

Sidebar: Recreating Mead’s Fried Chicken

            I have the hardest time following recipes, I always want to take short cuts, add my own tweaks or substitute ingredients. But I vowed to myself that I would follow the fried chicken recipe given to me by Lewis and Schmaltz.  So I bought whole milk instead of substituting the almond milk which I had in my refrigerator (though I thought about doing so a couple of times) and though four to six eggs seemed like way too many, I added six to a pint of milk just like the recipe called for.

            Now I really like fried food that’s done well but I’m not sure I’m the person who can do that—it’s a skill I don’t possess.  Despite that, I filled a very large skillet (and large is important as the you don’t want oil sputtering all over the stove and countertop) with vegetable oil and set the burner to high. I also turned on the vent over the stove—also necessary because the heat from the bubbling oil can set off the smoke detector. I also left my front door open just in case.

            The Mead recipe said you could double dip the chicken into the egg-milk mix and flour if you wanted extra crispy and so I did. But then I made a mistake. I dipped all the pieces while waiting for the oil to heat up. I would have done better to dip (or double dip) just before I put the meat in the hot oil. Because I didn’t, some of the batter started dropping off and by then I was out of the mix so I had to try to patch it back on resulting in some serious clumps of breading. But hey, I like crispy coating even if it didn’t make the chicken look somewhat misshapen.

            The chicken pieces sizzled when I placed them in the oil. I followed Guy’s instructions to do the legs and wings separately because they cook more quickly which meant that the batter on those pieces had even more time to drop off. Patch, patch again.

            Because I don’t fry often, the only thermometer I could find was one for meat which doesn’t go high enough to tell me when the oil is at 350°F. (I think my daughter borrowed my candy thermometer but that’s a different story). But I remembered a trick from my one food class in high school and that was if you stick a wooden spoon in oil and bubbles form around it and then start to float to the surface, that it’s about the right temperature for frying—somewhere between 325°F to 350°F.

Salad with the distinctive light pink colored Pearl’s Dressing.

            The chicken made a satisfying sizzling sound when I plopped it in the oil. But here’s another issue I encountered. How to tell when the chicken was done–I like sushi, pink pork chops and bloody steaks but really like my chicken thoroughly cooked. I didn’t know whether I could stick my meat thermometer into the frying meat or if breaking the crust would somehow ruin the taste or make it too greasy. That’s when I turned to Google which informed me that it was indeed okay and that I could either cut the meat to see if it was done or use the thermometer to determine if the interior had reached a temperature of165°F. You can also, the directions said, finish off the chicken in a 350°F preheated oven.

The Meads in front of their restaurant.

            When it was all over, I had a large platter of fried chicken, a large amount of Pearl’s Dressing for my salad (and many more) and a very messy kitchen.  Overall—it might not be the chicken we would have eaten at one of the Chicken Nook’s restaurants but it was pretty good.       

Sidebar: Memories

            “The Meads have since passed on but the legacy of the Chicken Nook lives on,” says Guy Lewis.

            That is so true. So many people have Chicken Nook memories.

            John Madill, a long time photographer for the Herald Palladium and now retired, emailed me to say he remembered getting a photo assignment in the early or mid 80’s for a new restaurant.

            “Turned out to be Mr. Mead coming out of retirement to start making his chicken again,” he says. “I remember him well in a white apron, stopping his prep work in the kitchen to come out and talk to me.”

            Kathy Thornton, owner of Thornton’s Café in downtown St. Joseph, remembers when she married her husband, Bob, that her in-laws. Norman and Annabelle Thornton hosted their rehearsal dinner at the Chicken Nook in 1973.

            “As I recall it was a wonderful—a lovely experience,” says Thornton who went attended St. Joseph High School with Guy Lewis.

            As for Lewis, he remembers a sandwich at the Chicken Nook that he really liked. Called the Dutchburger, he says it was basically shaved ham grilled on the griddle, flipped over with cheese being added and them flip it over again.

You can still buy Pearl’s Dressing at Roger’s Foodland on Hollywood Road in St. Joseph, MI.

            “It was served on a Kreamo bun,” says Lewis, “we also used Kreamo.”

            Lewis seldom makes the fried chicken, he’s turned his interest to artisan beers—teaching himself and also learning from the brew master at The Livery.

            “I make about gallons at a time include German-style Hefeweizen I call Hagar Hefeweizen and Pitcairn Vanilla Porter because I use an authentic Tahitian vanilla bean.

            When doing research on his family’s history, Lewis found an old advertisement for Pearl’s Dressing. It seems that an enterprise called Pasquale’s was bottling the dress and selling it. There was also a Pasquale’s Pizza in Benton Harbor, but neither Lewis or I have been able to find out any more information about the bottled dressing. But we’ll keep looking.

The following recipes are courtesy of Gina Lewis Schmaltz and Guy Lewis, grandchildren of Pearl and Buster Mead.

Chicken Nook Pan-Fried Chicken

2 ½ to 3 pound chicken

4-6 eggs

1 pint of whole milk (approximately)

All-purpose flour for dredging

Not your typical friend chicken place. Carl Steele played music for diner guests at Mead’s.

Salt to taste

Cut up the chicken into make 8 pieces. Make an egg dip of approximately 4 to 6 eggs whisked together with about a pint of milk. The egg mixture should be thick enough so it sticks well to the chicken pieces.

Dip the chicken into the egg dip then dredge in all-purpose flour. Salt the chicken well as the pieces are going into the flour.

If you want extra crispy crust, return to the egg dip mixture and then back into the flour.

Pan fry at about 350 to 365 degrees in enough vegetable oil to more than halfway cover the pieces. Breast and thighs should be fried separately for the legs and wings since the larger pieces take longer.

Turn the pieces when golden brown and finish frying the other side.

Cole Slaw

1 head cabbage

Shredded carrots (optional)

Apple cider vinegar, one splash

Sugar, to taste

Mayonnaise, to taste

Shred cabbage with a box shredder. Do not use pre-shredded cabbage, it is already too dry.

Add salt as you shred, it helps to release the moisture from the cabbage.

Mix sugar and heavy mayonnaise such as Hellman’s (not Miracle Whip) to taste. Mix well and set aside for a short time to let it all blend together.

The Meads used to hand out the recipes for their famous Pearl’s Dressing at their restaurants.

Pearl’s Dressing

Note: This is a slightly different recipe than the one I published in my column several weeks ago.

1 quart mayonnaise

3 ounces sugar

½ pint salad oil

2 ounces apple cider vinegar

1 10-3/4 ounce can of Campbell’s condensed tomato soup

Put all in mixer and blend at slow speed. Don not whip as this will cause your oil for separate from mixture.

Cookbooks for Holiday Giving

            I always think cookbooks make great holiday presents and so I asked Carrie Bachman and Joyce Lin, two of my good friends who work with cookbooks all the time, to share some of their favorites with me. I loved the ones they suggested, the only problem was deciding—because of space issues in this column—which ones to highlight.

            I chose Dorie Greenspan’s Everyday Dorie because I have every other cookbook she’s written and I think she’s great and I thought her recipe for Oven-Charred-Stuffed Peppers which can be easily multiplied to serve  whatever size crowd you’re expecting and can be served at any temperature so if they cool down after removing from the oven, it’s no big deal.

            I enjoyed making and serving the Curry Leaf Popcorn Chicken featured in Nik Sharma’s Season. This is the first cookbook forSharma who writes the blog “A Brown Table” and his recipes are exotic but also really easy and delicious. I also like that Sharma offers suggestions I can use in making this dish and others such as shaking the chicken (or even shrimp) in small batches in resealable plastic bags to get a uniform coating of flour.

            Named Amazon’s 2018 Cookbook of the Year, Now & Again: Go-To Recipes, Inspired Menus + Endless Ideas for Reinventing Leftovers by Julia Turshen is wonderful for people like me who have watched leftovers age less than gracefully in my refrigerator before, after serving their time, they get tossed. I won’t have to do that no I have a copy of Turshen’s book. Or at least that’s the plan.

            Taking the leftover thing one step further, Lindsay-Jean Hard in her Cooking From Scraps: Turn Your Peels, Cores, Rinds and Stems Into Delicious Meals—85 Scrumptious Recipe for Zero-Waste Cooking, shows how to make dishes like Carrot Top Pesto Tartlets, Danish Pancakes with Apple Core Syrup and Banana Peel Cake with Brown Sugar Frosting.

.

Oven-Charred Tomato-Stuffed Peppers

From Everyday Dorie © 2018 by Dorie Greenspan. Reproduced by permission of Rux Martin Books/Houghton Mifflin Harcourt. All rights reserved.

Makes 6 servings

About 7 tablespoons extra-virgin olive oil

1 garlic clove (ormore, if you’d like), germ removed and very thinly sliced

About 8 sprigs fresh thyme, rosemary, mint and/or parsley

6 fresh basil leaves, torn or chopped

Fine sea salt and freshly ground pepper

5 tablespoons unseasoned bread crumbs

8 oil-packed anchovies, minced

1 small lemon

Pinch of piment d’Espelette or cayenne pepper

3 large red and/or yellow boxy bell peppers

1 pint cherry tomatoes (25 to 30), halved

For serving (optional)

Extra-virgin olive oil

Ricotta

Snipped fresh chives or finely chopped other fresh herbs

Center a rack in the oven and preheat it to 425 degrees F. Put a deep-dish 9½-inch pie pan (or similar-size baking dish) on a baking sheet lined with parchment or a silicone baking mat. Spread a tablespoon or two of the oil over the bottom and sides of the pan, then scatter over the garlic slices, half of the herb sprigs and half of the basil and season with salt and pepper.

Stir the bread crumbs and anchovies together in a small bowl. Grate the zest of the lemon over and squeeze in the juice from half of the lemon (about 1 tablespoon; precision isn’t important here). Cut 6 thin slices from the other half of the lemon, then cut the slices in half; set aside. (If any lemon remains, squeeze the juice from it over the bread crumbs.) Stir in 1 tablespoon oil and season the crumbs with the piment d’Espelette or cayenne. Taste to see if you want some salt (anchovies are salty, so the seasoning might be just fine).

If you’d like (or need room in the pan), trim the peppers’ stems. Slice the peppers in half the long way and remove the ribs and seeds. Spoon an equal amount of the bread-crumb mixture into each pepper, scatter the remaining basil over and topeach one with 2 lemon slices. Divide the tomatoes among the peppers, placing them as close together as you can, and season with salt and pepper. (I put the tomatoes in the peppers cut side down because I think they look prettier that way, but there is no set rule here.)

Transfer the peppersto the pie pan, crowding them together and cajoling them so that they all fit. One or two might pop up, or their bottoms might not fully touch the base of the pan, but in the end they will be fine. Drizzle over enough of the remaining oil to lightly moisten the tomatoes and then strew over the remaining herb sprigs. (The peppers can be prepared a few hours ahead to this point and refrigerated,covered; let them stand at room temperature while the oven preheats.)

Bake the peppers for about 1 hour (check at the 45-minute mark), until they’re as soft as you’d like them to be — poke the side of one with the tip of a paring knife to judge. The juices and oil should be bubbling and the peppers charred here and there.Remove and discard the herbs from the top of the peppers.

You can serve the peppers straight from the oven, warm or at room temperature. If you’d like, drizzle them with a bit more oil, top them with a little ricotta (adding a dollop of ricotta is particularly nice if you’re serving the dish warm as a starter) and sprinkle with chives or other herbs.

Curry Leaf Popcorn Chicken

From Season by Nik Sharma with permission by Chronicle Books 2018.

Makes 4 servings

Seeds from 4 green cardamom pods

2 teaspoons coriander seeds

2 teaspoons cumin seeds

12 black peppercorns

2 cups buttermilk

2 to 3 serrano chiles, seeded, if desired

6 scallions (white and green parts)

30 curry leaves, preferably fresh

4 garlic cloves, peeled

1½ teaspoons cayenne pepper

1-inch piece fresh ginger, peeled and chopped

¼ cup fresh lime juice

1 tablespoon plus 1 teaspoon fine sea salt

2 pounds boneless, skinless chicken breast

2 cups all-purpose flour

1 teaspoon baking powder

½ teaspoon baking soda

3 cups neutral-tasting oil

4 green Thai chiles, seeded, if desired

Favorite hot sauce for serving

Heat a small, dry skillet over medium-high heat. Add the cardamom, coriander, cumin seeds, and the peppercorns, and toast for 30 to 45 seconds, swirling the mixture occasionally until the seeds release their aroma and start to brown. Divide the toasted spice mixture in half. Transfer one half of this mixture to a spice grinder and pulse to a fine powder. (You can prepare the spices up to 1 week in advance and store in an airtight container in a cool, dark place.)

In a blender, combine the remaining toasted spice mixture with the buttermilk, serrano chiles, scallions, 15 of the curry leaves, the garlic, 1 tsp of the cayenne, the ginger, lime juice, and 1Tbsp of the salt. Pulse until completely smooth and transfer to a large resealable plastic bag. Pat the chicken breasts dry with paper towels. Trim excess fat from the chicken, and cut the flesh into 1 in cubes. Add to the marinade. Seal the bag and shake to coat evenly. Refrigerate for 4 hours.

Meanwhile, prepare the dredging mixture. In a large resealable plastic bag, combine the remaining half of the ground spice mixture with the flour, baking powder, baking soda, remaining ½ tsp cayenne, and remaining 1 tsp salt, shaking vigorously to blend. Finely chop 10 of the remaining curry leaves and add them to the dredging mixture. Seal the bag and shake again to mix well.

Once the chicken has marinated, use tongs to lift out half the chicken pieces, shaking off the excess batter, and transfer to the bag with the dredging mixture. Seal the bag and shake to coat evenly. Transfer the chicken pieces to a wire rack. Repeat with the remaining chicken.

In a medium Dutch oven, heat the oil over medium-high heat to 350°F. Fry the chicken in batches, turning occasionally, until golden brown and cooked through, 4 to 5 minutes. Using a slotted spoon or a spider, transfer the chicken to paper towels to drain.

After the chicken is cooked, prepare the garnish: Cut the Thai chiles in half lengthwise. In the hot oil left in the pot, deep-fry the chiles and remaining 5 curry leaves until crispy, 30 to 40 seconds. Drain on paper towels.

Put the chicken on a serving plate, garnish with the chiles and fried curry leaves, and serve hot with the maple-vinegar sauce or hot sauce.

Stuffed Mushrooms with Walnuts, Garlic + Parsley

From Now & Again by Julia Turshen with permission by Chronicle Books 2018.

Serves 4 as a nosh with drinks.

¼ cup walnut halves

A large handful of fresh Italian parsley leaves (a little bit of stem is fine!)

1 large garlic clove, minced

3 tablespoons coarsely grated Parmesan or pecorino cheese

½ teaspoon kosher salt

2 tablespoons olive oil

12 small cremini or button mushrooms, stemmed

Preheat your oven to 400°F. Line a small sheet pan or baking dish with parchment paper and set it aside.

Put the walnuts, parsley, garlic, cheese, and salt into a food processor, in that order. Pulse until everything is finely chopped. Add the olive oil and pulse to combine.

Use a small spoon to distribute the walnut mixture evenly among the mushrooms, placing it in the cavities the now-gone stems left behind. Line up the mushrooms, stuffed-sides up, on the prepared sheet pan.

Roast the mushrooms until softened and the tops are lightly browned, about 15 minutes. Let the mushrooms cool for a few minutes, then serve warm.

Banana Peel Cake with Brown Sugar Frosting

Cooking From Scraps, (c) 2018 by Lindsay-Jean Hard. Reproduced by permission of Workman. All rights reserved.

For the cake:

Peels from 2 very ripe bananas, stem and very bottom discarded 

1/2 cup unsalted butter, softened, plus more for buttering the pans

1 1/2 cups granulated sugar

2 large eggs, separated

1/2 cup buttermilk

1 2/3 cups cake flour plus more flour (any type) for flouring the pans

1 teaspoon baking soda

1/4 teaspoon baking powder

1/2 teaspoon fine sea salt

For the brown sugar frosting:

1/2 cup butter

1/4 cup milk, 2% or higher

1 cup packed brown sugar

1 3/4 to 2 cups powdered sugar, sifted

Preheat the oven to 350°F.

To make the cake: Cut the banana peels into 1-inch pieces and place them in a small saucepan with 1 cup of water. Bring to a boil over medium-high heat, then reduce the heat and simmer for 10 minutes. Remove thepan from the heat and allow the mixture to cool slightly, then strain the banana peels, reserving the cup of the cooking water.

Meanwhile, butter and flour the sides of two 8-inch round cake pans and line the bottoms with parchment paper. Butter and flour the pans again to coat the paper.

Transfer the peels and the 1/4 cup of cooking water to a tall, narrow container and puree until completely smooth with an immersion blender (a mini food processor would do the trick, too!).

Cream together the butter and sugar using an electric mixer (or a wooden spoon for an arm workout) until pale and fluffy, about 3 to 5 minutes.Add the egg yolks one at a time, mixing until incorporated, and scraping down the sides of the bowl after each addition. Mix in the banana peel mixture, then stir in the buttermilk until well combined. 6. In a separate medium-size bowl, whisk together the flour, baking soda, baking powder, and salt. Add the dry ingredients to the bowl with the butter mixture and stir gently, just until combined. 

Put the egg whites in another bowl (make sure it’s clean and dry!)and whisk until soft peaks form—either by hand or with the whisk attachment onan electric mixer. If using an electric mixer, start slowly and gradually increase speed to medium-high. You’ll know you’re done when you pull out the whisk or beater and a soft peak is formed, but immediately collapses. Gently fold the egg whites into the batter and divide the batter evenly between the two prepared pans.

Bake for about 25 minutes, rotating the pans halfway through, until the top is golden and a toothpick inserted into the center of the cake pulls out with dry crumbs rather than wet batter. Let the cakes cool completely in the pans.

When the cakes are completely cool and you’re ready to assemble it, make the frosting. Melt the butter in a medium pan over low heat. Stir inthe brown sugar and cook, stirring constantly, for 2 minutes. Stir in the milk,raise the heat to medium-high, and cook, stirring constantly until the mixture boils. Remove from the heat, and let cool until lukewarm. Gradually whisk in 1 3/4 cups powdered sugar, beating until smooth. Add the additional 1/4 cup powdered sugar if the frosting is too loose. Use the frosting immediately, asit will begin to thicken and stiffen as it sits.

When the cakes are completely cool, remove from the pans and peel off the parchment. Put one layer of the cake on a serving platter and spread about one third of the frosting evenly over the top. Set the other layer on top, and spread the remaining frosting over the top and sides of the cake.

Eataly: All About Pasta: A Complete Guide with Recipes

The largest marketplace of all things doing with Italian edibles in the U.S., the 63,000-square-foot Eataly in Chicago is a mecca for food lovers, a vast space crowded with a variety of venues including unique specialty restaurants, stalls selling meat, cheese, breads, sweets and fish (though really stall is too plebian a term—these are sparkling and enticing places where you can get lost for seemingly hours looking at all the delectable offerings), rows of olive oils and wines and even a Nutella Bar (be still my beating heart). One of more than 40 worldwide concepts, Eataly Chicago, owned by Joe Bastianich and Mario Batali,  not only offers a plethora of ingredients, classes and events but also an expanse of cookbooks including the second in their Eataly series, All About Pasta: A Complete Guide with Recipes (Rizzoli 2018; $25).EatalyPasta_p027 btm

With the guiding philosophy of “the more you know, the more you enjoy,” this book immerses readers into a world of pasta from the easily recognizable—spaghetti and linguine—to the rarely found and more esoteric—maltagliati (translation: badly cut), mallopredus (pasta dough with saffron) and tajarin—thin egg pasta strands also known as taglierini. Of course, you’re never going to learn all the different types of pasta  because even the experts don’t know since no one has successfully completed a survey of all the pasta shapes in the world. There are simply too many different shapes and multiple names for each.EatalyPasta_p123

But there are ways of differentiating one from another and how to use them in creating delicious meals which the book shares. Take long and short pastas. As a basic rule, long dried semolina pasta pairs with oil-based sauces, smooth tomato sauces and seafood. Tube-shaped semolina pasta, known as la pasta tubolare, with its hollow centers, is perfect for capturing the ingredients used in the sauce.EatalyPasta_p049

Le pastine or small pasta is most often cooked in either broth or chunky soups.  Other pasta types include le perle del Mediterraneo–semolina pastas made by rubbing hard wheat flour with water until small balls form, cereali antichi is made with heirloom or ancient grains, while croxetti ot corzetti is the name for two different types of pasta that are pressed or stamped rather than rolled out.

We told you was complicated and it gets even more so as the book explores the different types of flours used for making pasta, the different sauces and il tocco finale—the finishing touch which can be such flavorful ingredients as cheese, basil, spicy chili oil or just a handful of minced flat leaf parsley to add a bright herbaceous flavored to almost any dish.EatalyPasta_p071 btm copy

The wonders of this book, with its immense amount of information as well as recipes, is that you can go deep or you can just choose the information you want. Either way, you’ll end up knowing a lot more about pasta—”a world fashioned out of flour and water.”

The following recipes are courtesy of Eataly.

Vesuvio al Ragu di Salsiccia e Scarola

Vesuvio Pasta with Sausage Ragu and Escarole

Serves 12

12 ounces sweet sausage

1 tablespoon red wine

One cup tomato puree

½ cup chicken or beef stock

3 cup shredded escarole

Find sea salt to taste

Coarse sea salt for pasta cooking water

1 pound Vesuvius pasta or other short pasta preferably with a complex shape

3 tablespoons extra virgin olive oil

Grated Romano, pecorino or parmesan cheese for serving

Remove the cost sausage casings and crumble the meat into a bowl. Sprinkle the wine over the meat and massage the wine into the meat by hand until it is soft and elastic, about two minutes about two minutes.

Place the meat in the cold skillet with high sides. Placed the skillet over low heat and slowly cook the meat until it’s no longer raw looking., about two minutes. Do not brown the meat.

At the tomato puree and stir to combine. Increase the heat until the tomato puree is simmering gently.

Pour in the stock, stir once, and decrease the heat until the ragu is at a very gentle simmer, with a bubble just occasionally breaking the surface. Simmer uncovered without stirring for two hours. The meat should poach in the liquid and turn very soft.

When the sauce is cooked, carefully spoon off and discard any liquid remaining on the top. Stir in the escarole and cook until just wilted, about two minutes. Season to taste with sea salt. Remove from heat.

Bring a large pot of water to boil for the pasta. When the water is boiling salted add the pasta. Cook until the pasta is al dente. Smear a small amount of the sauce on the bottom of the warm pasta serving bowl. Then transfer it immediately to the serving bowl. Top with remaining sauce and toss vigorously to combine. Drizzle on the olive oil and toss again. Serve immediately with grated cheese on the side.

Spaghettoni al Tonno (Pasta with Tuna)

Yield: 4 servings

1 pound spaghettoni (or bucatini)

1 (7-ounce) jar Italian tuna preserved in olive oil, drained

2 tablespoons salted capers, rinsed & drained

2 tablespoons plus 1 teaspoon extra virgin olive oil

¼ cup breadcrumbs

1 yellow onion, minced

1 clove garlic, sliced

1 Calabrese chili pepper in olive oil, drained & minced

Zest of 1 lemon, grated

Coarse sea salt, to taste

Place 2 tablespoons of the olive oil in a large pan over medium-low heat. Add the onion, garlic, and chili pepper and cook, stirring frequently, until the onion and the garlic are golden. Flake the tuna into the pan, and cook until heated through, about 2 minutes. Stir in the capers and the lemon zest, and remove from the heat.

Toss the breadcrumbs with the remaining olive oil, and toast in a toaster oven or cast-iron skillet over medium heat until crisp.

Meanwhile, bring a large pot of water to a boil. Add the sea salt and spaghettoni. Cook, stirring frequently with a long-handled fork, until the spaghettoni is al dente.  Drain, reserving about 1 cup of the cooking water.

Transfer the pasta to the pan with the tuna. Toss vigorously over medium heat until combined, about 2 minutes. If the pasta looks dry, add a small amount of the cooking water, and toss until it looks moist.

Garnish with the toasted breadcrumbs, and serve immediately. For another taste of Calabria, repeat tomorrow.

Eataly Chicago

Eataly: All About Pasta

Herbsaint: A New, New Orleans Classic

I was in New Orleans this fall and stayed at the B&W Courtyards, a charming bed and breakfast on Chartres Street that is a collection of 1854 cottages joined together by cobblestone walkways and courtyards with pretty fountains and within walking distance of the French Quarter. The walking distance was lucky as New Orleans is so full of wonderful restaurants that a lot of walking is required to burn off some of the calories.gallery12

One of the restaurants I wanted to try was Herbsaint which is frequently named one of the best restaurants in the city (no easy feat) and whose executive chef/CEO Donald Link is a James Beard award winning chef.  Located at 701 Saint Charles Avenue it was a long walk from our B&B but New Orleans has a great trolley car system which took us from the French Quarter to Lafayette Square where Herbsaint is located. Link’s first cookbook, Real Cajun: Rustic Home Cooking from Donald Link’s Louisiana (Clarkson Potter) won the James Beard top award for Best American Cookbook. He has a new one out as well, Down South Bourbon, Pork, Gulf Shrimp & Second Helpings of Everything.

gallery8            The restaurant’s name, Herbsaint, comes from a favored New Orleans anise-flavored liqueur which dates back to the early 1930s and like other NOLA drinks such as Sazerac is enjoying a new popularity because of the popularity of vintage cocktails.

I thought it would be fun to share some of Herbsaint’s recipes that we tried. Needless to say, after dinner, we needed the long walk back to our B&B.gallery6

Herbsaint’s Shrimp Bisque

1 tablespoon butter

1 cup onion, chopped

1 cup celery, chopped

1/2 cup carrot, chopped

1/2 cup Scallions

1 teaspoon paprika

1 teaspoon cayenne

1 teaspoon salt

2 cups tomatoes, chopped

5 whole shrimp cut up with shells on

1 pint shrimp stock

1 pint Water

1/4 cup rice

1 sprig Tarragon

Dash of Brandy and Herbsaint

2 teaspoons salt

1/2 cup heavy cream

1 tablespoon butter

In a heavy bottom sauce pot, sauté the onion, carrot, celery, and scallion with the spices until soft. Add tomatoes and shrimp and cook until tomatoes break down, about 15-20 minutes.

Add shrimp stock and water and simmer an additional 10 minutes then add the rice and cook another 15 minutes. Add the tarragon about 5 minutes before removing soup to strain. Put soup in small batches in a blender and blend until smooth, then strain.  Return to heat and finish with a dash of brandy and Herbsaint, salt, cream, and butter.

Chef’s note: A little hot sauce never hurts.

Herbsaint’s Coconut Cream Tart with Macadamia Nut Crust

Crust

1 cup dry-roasted macadamia nuts

1 1/4 cup all-purpose flour

1/2 teaspoon salt

1/2 cup unsalted butter, room temperature

1/3 cup sugar

1 large egg yolk

Filling

2 1/2 cups heavy whipping cream, divided

1 vanilla bean, split lengthwise

3/4 cup sugar, divided

2 tablespoons cornstarch

3 large egg yolks

1 cup medium shredded unsweetened coconut

Purchased caramel sauce

Optional Fresh Fruits

Raspberries

Blackberries

Pineapple

Mango

For Crust: Preheat oven to 350 degrees F. Spread macadamia nuts on rimmed baking sheet. Bake until light golden brown, about 6 minutes. Cool.

Place cooled nuts, flour, and salt in processor. Using on/off turns, process until nuts are finely ground. Using electric mixer, beat butter and sugar in medium bowl to blend. Beat in yolk. Add nut mixture; beat until blended.

Press into 9-inch-diameter tart pan with removable bottom. Trim excess dough overhang. Pierce all over with fork. Cover and chill overnight.

Preheat oven to 375 degrees F. Bake crust until golden brown, pressing on bottom of crust with back of spoon if bubbles form, about 26 minutes. Cool completely.

For Filling: Heat 1 1/2 cups cream in heavy medium saucepan. Scrape seeds from vanilla bean into pan; add bean. Bring just to boil, remove from heat, cover, and let stand 15 minutes.

Return vanilla cream just to boil. Whisk 1/2 cup sugar and cornstarch in medium bowl to blend. Whisk sugar mixture into vanilla cream. Whisk yolks in large bowl to blend; gradually whisk hot vanilla cream into yolk mixture.

Return mixture to saucepan. Cook over medium-high heat until mixture boils and becomes thick, stirring constantly, about 3 minutes. Transfer pastry cream to medium bowl. Press plastic wrap directly onto surface of pastry cream. Refrigerate until cold and firm, at least 4 hours or overnight.

Preheat oven to 350 degrees F. Spread coconut on rimmed baking sheet. Bake until lightly toasted, about 10 minutes. Cool completely.

Whisk remaining 1 cup cream and 1/4 cup sugar in large bowl until peaks form. Whisk in pastry cream. Continue whisking by hand until thoroughly combined. Gradually stir in coconut. Spoon mixture into cooled tart crust. Cover and refrigerate tart at least 1 hour and up to 8 hours.

Cut tart into wedges and serve with caramel sauce and fresh fruit.

herbsaint.com


Isla Mujeres: Ixchel’s Island

Isla Mujeres or Island of the Women earned its name in 1517 when Spanish explorers discovered statues of Ixchel, the Mayan Moon Goddess on this island just 25 minutes by ferry from Cancun.  Ixchel’s temple is still here, perched atop a rocky cliff overlooking the Caribbean Sea in Garrafon Reef Park – it’s where Mayan women once traveled to pray for a fertile marriage. Isla_Mujeres,_Garrafon_(24032614729)

Today, visitors come for snorkeling in the fish filled coral reefs, zipling above Mayan ruins, frolicking with dolphins and taking the short jitney ride to the bustling shopping plaza on Avenue Rueda Medina in the island’s only town.  Here artisans display their wares – elaborately embroidered Mayan dresses, Talavera pottery and an assortment of pretty trinkets. Isla_Mujeres,_Pelicanos_(24374202586)

Wander the town, past brightly colored stucco homes, stopping at the stalls of local vendors for fresh fruit sprinkled with fiery red pepper and spicy hot meat stuffed into freshly made tortillas.Azules_de_Isla_mujeres_-_panoramio_(1)

The following recipe, typical of Isla de Mujeres, is courtesy of Pati Jinich, host of the popular Emmy and James Beard nominated PBS series Pati’s Mexican Table and author of Pati’s Mexican Table: The Secrets of Real Mexican Home Cooking and Mexican Today: New and Rediscovered Recipes for Contemporary Kitchens.

Brocoli y Coloflor Rostizadas con Aderezo de Cotija

Roasted Broccoli & Cauliflower with Queso Cotija Dressing

5 to 6 servings

For the vegetables:

1/2 cup freshly squeezed lime juice

1/2 cup freshly squeezed orange juice

3 chopped chiles de arbol or 1 generous teaspoon red pepper flakes

1/2 cup olive oil plus more for brushing

1 teaspoon kosher or coarse sea salt

1/4 teaspoon freshly ground black pepper

2 pounds broccoli cut into 1/4″ vertical slices, including thick part of stem

2 pounds cauliflower cut into 1/4″ vertical slices, including thick part of stem

For the dressing:

1/2 cup crumbled queso cotija

2/3 cup Mexican crema

1/2 cup vegetable oil

2 teaspoons sherry vinegar

2 tablespoons water

1 clove garlic

1/2 teaspoon kosher or coarse sea salt or to taste

Preheat oven to 475 degrees Fahrenheit.

Mix the lime juice, orange juice, olive oil, chile de arbol, 1 teaspoon salt and freshly ground black pepper.

Brush 2 large baking sheets with olive oil. Place the broccoli and cauliflower on each baking sheet, making sure that it is well spread out and not crowded. Evenly pour the orange juice mixture all over the vegetables.

Place in the oven and bake for 25 to 30 minutes, flipping once in between, until well roasted and considerably charred. Remove from the oven.

In the jar of the blender, combine the queso cotija, Mexican crema, vegetable oil, sherry vinegar, water, garlic, and 1/2 teaspoon salt. Puree until smooth.

Serve the broccoli and cauliflower in an extended platter and ladle the queso cotija right on top, or let your guests spoon sauce onto their plates and dip their vegetables in the sauce to their liking.

Isla_Mujeres,_Garrafon_(24032614729)
All photos courtesy of Wikimedia 

Website: http://www.garrafon.com/

Hours: The park is open every day from 9:00 am until 5:00 pm in winter and from 9:00 am until 6:00 pm in summer.

Departures from Cancun: 9:30am and 11:00am
Returns from Garrafon: 4:15 pm and 5:30 pm (subject to change)


Carla Hall’s “Soul Food: Everyday and Celebration”

This spring, just a day or so before she was in Benton Harbor doing her cooking demonstration at the KitchenAid Senior PGA Championship at Harbor Shores, both Carla Hall—and the world—learned her long-running show, ABC’s Daytime Emmy-winning lifestyle series The Chew was being canceled.

“I need a job,” she told the crowded roomful of people. “Does anyone know of a job for me?”

And  because she is so lovable, the entire audience sighed and I’m sure more than a few thought, what can I do to help Carla find another job.

Those concerned about what Carla was going to do next, quit worrying because this kitchen dynamo seems to be everywhere. Now the food contributor for GMA’s Day, the third hour of Good Morning America,  she just made an appearance at the prestigious Chicago Ideas joining others for a panel discussion titled “More than a Meal: Food as a Cultural Nexus “and her newest cookbook, Carla Hall’s Soul Food: Everyday and Celebration with Genevieve Ko (Harper Wave 2018; $29.99) just hit the shelves this Monday, October 23.

Poured Caramel Cake
Photo credit Gabriele Stabile

“It’s so funny when The Chew ended everyone said what are you doing and now I say what am I not doing?” Hall tells me on the phone after apologizing profusely for being late to call due to a scheduling mix-up.

Describing the years she co-anchored, with Clinton Kelly and Michael Symon, The Chew as like wearing gold handcuffs, Hall says it was an amazing experience but the 39 weeks a year she spent filming didn’t leave time for much else.

“Freedom—it’s lovely,” says Hall who is .glad to have the time to explore her food journey in her book. It’s a melting pot of her heritage—ancestors from Nigeria and Portugal and Southern by birth–and career choices– eschewing her training as an accountant to become a fashion model in Paris and then getting into the food scene, graduating from L’Academie de Cuisine in Gaithersburg, Maryland, opening a catering business in New York City and appearing on Bravo’s “Top Chef” and “Top Chef: All Stars.” With her distinctive looks and intelligent dead-pan humor, she connects quickly with audiences whether in person or on screen, showcasing her ability to throw together a quick meal, her philosophy of cooking with love and accenting it all with her famous catch phrase, “Hootie Hoo,” success came quickly.

Yet at some point during her time in Europe and in New York, she found herself not only yearning for the soul food cooking of her grandmother, a hospital nutritionist, but also for a way to explain that type of cookery to others. She also, in her cookbook, strives  to differentiate both what she terms celebration and everyday types of southern cuisine.

“On the everyday side I have a recipe for sea island shrimp and grits which is usually really heavy with cream butter, maybe a ham and Tasso gravy and maybe cheese,” she says. “I stripped all of that out after talking to someone in the Carolina coast, making it very simple and on  the lighter side—the shrimp with some vegetables and some tomatoes.  On the celebration side I wanted to do the smothered chicken—everything goes in a pot, gravy is made with the sauce, the chicken falls off the bone—it’s like a dish my grandmother would make, it’s delicious.”

Of course in every chef’s kitchen there’s a failure here and there.

“I was doing ginger cake with lemon cream and the lemon cream just wasn’t good,” she says. She also worked exceptionally hard on her hot water cornbread recipe.

“I started off trying to change it because I remember doing it in Clinton Kelly competition and just two people picked me out of 10, the winner was a cheesy casserole,” she says with some disdain. “So I was thinking maybe I have to change it. I was cooking, cooking and then it was the day of the shooting for the book and I went back to the tried and true. That was an aha moment.”

Always creative—after all one of the first recipes she demonstrated on GMA’s Day was a wine can chicken—Hall says might be looking outside and see a tree turning brown and  think oh, how about a crust.

Spoonbread Dressing
Photo credit Gabriele Stabile

“Someone turned me on to these fruit and nut snacks from Trader Joes and I’m like that looks like a filling for a pastry, so took a pastry and put this round into it and cooked it,” she says. “One of the reasons I love to cook is I love process and cooking is a process.  I love puzzles which is why I liked accounting but of course if you get too creative in accounting you go to jail.”

Her book is the first step in educating others about soul food.

“I am so excited about the book. When I saw the first copy and I opened it up and cried. I smelled it,” says Hall. “When I talk to people abut soul food and people say oh soul food is having it’s having its moment and I think for me it’s always had this moment. It’s about a person’s culture. Writing it was a very personal journey, about my ancestry, about me trying to change people’s perspective but it was a journey I didn’t expect.”

The following recipes are from Carla Hall’s Soul Food: Everyday and Celebration

Carla’s Spoon Bread

¼ cup unsalted butter, softened

1 onion, finely chopped (1 cup)

1 celery stalk, finely diced (1/2 cup)

1 ½ teaspoons kosher salt

½ teaspoon poultry seasoning

2 cups whole milk

1 cup water

1 tablespoon sugar

1 cup fine stone-ground yellow cornmeal

11 ounce can whole kernel corn, drained

1 teaspoon baking powder

3 eggs

Preheat the oven to 350 degrees F. Use 1 tablespoon of the butter to generously grease a 3-quart rectangular baking dish.

In a large saucepan melt the remaining 3 tablespoons butter over medium heat. Add the onion, celery, and salt. Cook, stirring occasionally, for 4 minutes or until just tender. Add the poultry seasoning; cook and stir for 1 minute.

Add the milk, water, and sugar; bring to boiling. Continuously whisk the mixture while you pour in the cornmeal in a slow, steady stream. Cook, whisking constantly, for 5 minutes or until the cornmeal has absorbed all the liquid and is thick and smooth. Remove from heat and stir in the corn and baking powder. Cool for 20 to 30 minutes or until lukewarm, stirring often to avoid clumping.

In a large bowl whisk the eggs for 5 to 7 minutes or until pale yellow and very foamy with no liquid remaining. Add beaten eggs, one-third at a time, to the cornmeal mixture, folding gently until incorporated. Spread evenly in the prepared dish.

Bake 25 to 30 minutes or until golden brown and set and top springs back when gently touched. Cool slightly before serving (spoon bread may fall during cooling).

Caribbean Smothered Chicken With Coconut, Lime and Chiles

4 large bone-in, skin-on chicken thighs (about 1 1/2 pounds total)

Kosher salt

Freshly ground black pepper

1 teaspoon vegetable oil

6 large sprigs thyme, plus fresh thyme leaves for serving

2 large onions, thinly sliced

2 cloves garlic, coarsely chopped

1 habanero chile, partially slit open

1 cup low-fat coconut milk

1/4 cup water

Finely grated zest and juice of 1 large lime, plus wedges for serving

1/2 teaspoon curry powder

Season the chicken generously all over with salt and pepper.

Heat the oil in a large, shallow Dutch oven or deep sauté pan over medium-high heat. Add the chicken to the pan, skin sides down. Sear for about 5 minutes, turning them over once, until browned on both sides and some of their fat has rendered. (They will not be cooked through.)

Push the thighs to one side of the pan, turning them skin sides up; add the thyme and onions to the other side of the pan and reduce the heat to medium-low. Cook for about 4 minutes, stirring occasionally, or until they pick up some color.

Add the garlic, chile pepper and 1/2 teaspoon each of salt and pepper. Cook, stirring, for 1 minute, then pour in the coconut milk and water. The browned skin on the thighs should remain above the level of liquid. Increase the heat to medium; once the liquid begins to boil, move the onion mixture around the chicken pieces, as needed. Cover and cook for about 20 minutes, or. until the chicken is cooked through. Discard the thyme sprigs.

Uncover and stir in the lime juice. Cook for about 5 minutes, then stir in the curry powder and lime zest. Scatter some thyme leaves on top.

Serve right away (with or without the chile pepper), with lime wedges.

Poured Caramel Cake

16-20 servings; makes one 9-by-13-inch cake

6 tablespoons (3/4 stick) room-temperature unsalted butter, cut into tablespoons, plus more for the pan

2 cups flour, plus more for the pan

3/4 cup buttermilk

1 teaspoon vanilla extract

1 1/4 cups sugar

2 teaspoons baking powder

1/2 teaspoon salt

2 tablespoons vegetable oil

3 large eggs, at room temperature

For the caramel:

8 tablespoons (1 stick) unsalted butter

1 3/4 cups sugar

1/2 teaspoon salt

12 ounces evaporated milk

For the cake: Preheat the oven to 350 degrees. Use some butter and then flour to coat a 9-by-13-inch baking pan or dish.

Combine the buttermilk and vanilla extract in a liquid measuring cup.

Combine the 2 cups of flour, the sugar, baking powder and salt in the bowl of a stand mixer or handheld electric mixer. Beat on low speed until well blended. Add the oil (low speed); once that is evenly distributed, add the butter a tablespoon at a time, beating until fully incorporated. The mixture will have the consistency of coarse sand.

Add the eggs one at a time, beating well after each addition. Stop to scrape down the bowl. On medium speed, gradually add the buttermilk mixture, beating to form a smooth batter.

Pour into the pan; bake (middle rack) for about 25 minutes, or until a tester inserted into the center of the cake comes out clean. Transfer the pan to a wire rack; let the cake cool completely.

Meanwhile, make the caramel: Place the butter in a deep saucepan over medium heat. Once the butter is half melted, add the sugar and salt. Cook, stirring with a wooden spoon, until the mixture is dark golden brown. It will look grainy and the fat will separate from the sugar, then come back together.

Remove from the heat.

Jane Ammeson can be contacted via email at janeammeson@gmail.com or by writing to Focus Department, The Herald-Palladium, P.O. Box 128, St. Joseph, MI 49085.


Anne of Green Gables: Read the Book & Visit Prince Edward Island

I never read Anne of Green Gables, the 1908 novel by L. M. Montgomery about an orphan named Anne Shirley who is sent to live on a farm owned by a middle-aged brother and sister on Prince Edward Island (PEI). I’m not sure why since it’s considered a children’s classic, having been translated into 20 different languages and selling more than 50 million copies and my mother was all about me reading the classics. Besides that, starting around age eight, I worked at the local public library, helping my mother unpack boxes of books that had just been delivered by the binary. It was a strictly off the books payment for me and I’m not sure how much I made but it was fun helping my mom who by the time she retired had worked for the East Chicago Public Library for half a century. Until I graduated college I spent most summers working there and so I had easy access to whatever books I wanted to read and since Laura Wilder’s Little House on the Prairie novels were a favorite, so segueing into Anne and PEI, one eastern Canada’s Maritime Provinces, would seem a good fit.

©TPEI012_PB_Springbrook_1

I still haven’t read any of the Anne books, seen the movies or watched the TV series. But I was in Charlottetown, the charming Victorian-era capital of PEI and decided to take a tour of the Green Gables Heritage Place, part of L.M. Montgomery’s Cavendish National Historic Site.DSC_0799

The drive from Charlottetown to Green Gables meanders past sandy beaches, red roofed lighthouses and cute little fishing hamlets all of which have at least one restaurant offering lobster rolls and mussels as well as a store or two selling jams made from locally grown fruits, wood lobster traps to take home and, of course, Anne paraphernalia. In the turn before we entered Green Gables, a sign for bicycle rentals was written in French, English and Japanese. I got the French part because the Maritimes are near Quebec and some islands are English and others French. As for the Japanese, our guide told me, the Montgomery books (which were translated into Japanese in 1952) are super popular there and many tourists come from Japan to visit the places mentioned in the book.©TPEI013_JS_Anne_Green_Gables_0663

Fortifying ourselves with ice cream (dairy farms abound on PEI and they’re known for the richness of their milk and, hence, their ice cream) from the Butter Churn Cafe, we wandered through the 19th century gardens with their white picket fencing, arbors, seats and old fashioned blooms such as giant hollyhocks and delphiniums.   Interpretative guides wearing early 20th century country garb and, straw hats took us through the gabled home and then we followed the path way leading towards the Atlantic Ocean. Several times we passed Anne-wannabes, their hair spray colored red and crowned with, of course, straw hats.Anne kitchen

In the gift shop, I looked at the prettily illustrated The Anne of Green Gables Cookbook, written by L. M. Montgomery’s granddaughter Kate Macdonald. Each of its recipes ties in with what Anne and her family, neighbors and friends ate in the book and I thought it would be fun to share a few.©TPEI013_JS_Anne_Green_Gables_0679

The following recipes are from the Anne of Green Gables cookbook by Kate MacDonald.

Poetical Egg Salad Sandwiches

“The girls sat down by the roots and did full justice to Anne’s dainties, even the unpoetical sandwiches being greatly appreciated by hearty, unspoiled appetites sharpened by all the fresh air and exercise they had enjoyed.” —Anne of Avonlea (Chapter 13: A Golden Picnic)

4 eggs

1 stalk celery

3 tablespoons mayonnaise

1⁄2 teaspoon salt

Ground pepper, pinch

1⁄4 cup butter, softened

2 tablespoons dried mint or 2 tablespoons parsley

8 slices bread, fresh

In small saucepan cover the eggs with cold water – at least 1 inch above the eggs. Place the saucepan over high heat and bring to a boil.

Remove the saucepan from the heat and cover it. Let the eggs stand in the hot water for 25 minutes. Uncover the saucepan and put it under cold running water for 10 minutes to cool the eggs.

Meanwhile wash the celery stalk under cold running water. Chop it into tiny pieces on the cutting board.

Peel the eggs. Add them with the chopped celery to the small mixing bowl and mash them together with the fork.

Stir the mayonnaise, salt, and pepper into the egg mixture. Set the egg salad in the refrigerator.

Mix the softened butter with the dried mint or parsley in the small bowl. Set aside.

Cut each slice of bread with a large cookie cutter. Save the bread scraps in a little plastic bag for bread crumbs.

Butter one side of each bread shape with the minted butter. On half of the bread shapes spread the egg salad. Place the other half of the bread shapes on top. Makes 4 poetical sandwiches.DSC_0804

Maritime Gingersnaps

“You’ll put down the old brown tea set. But you can open the little crock of cherry preserves. It’s time it was being used anyhow—I believe it’s beginning to work. Any you can cut some fruit-cake and have some of the cookies and snacks.” —Anne of Green Gables (Chapter 16: Diana is Invited to Tea with Tragic Results)

1/2 cup molasses

1⁄4 cup shortening

1 1⁄2 cups all-purpose flour

1⁄4 teaspoon baking powder

2 teaspoons ground ginger

1 teaspoon cinnamon

1 teaspoon ground cloves

1⁄4 teaspoon salt

Preheat oven to 375°F.

Combine molasses and shortening in a small pan; heat, stirring constantly, just to boiling over medium heat. Remove immediately from heat and allow to cool.

Meanwhile measure remaining ingredients into a large bowl. When molasses mixture has cooled, pour over flour mixture and mix well to combine. Chill dough for 10 minutes.

Shape into small (about quarter-sized) balls and arrange 2 inches apart on baking sheets. Flatten with bottom of a drinking glass or with fingers.

Bake until dry and crisp, about 8-10 minutes. Watch carefully as they may easily burn.

When done, place pan on cooling rack and cool cookies on baking sheet for 5 minutes. Remove from baking sheet to cooling rack and cool completely.

Once completely cooled, store in an airtight container.

Jane Ammeson can be contacted via email at janeammeson@gmail.com