Danielle Walker’s “Eat What You Love”

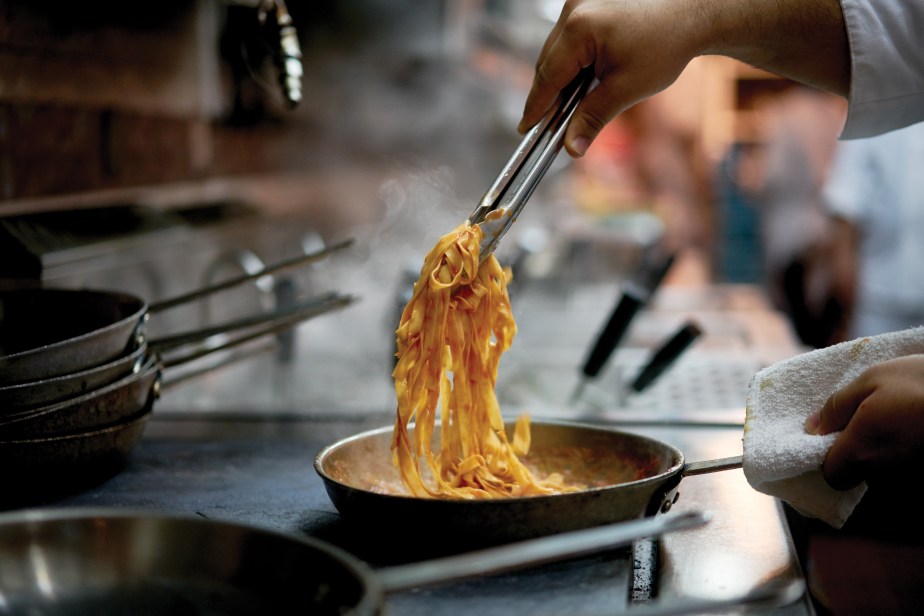
I love the premise of Danielle Walker’s latest cookbook, Eat What You Love: Everyday Comfort You Crave, with its idea that even if you’re gluten-intolerant (which so many people seem to be), have a dairy allergy, suffer from an autoimmune disease, are following a Paleo diet or just want to incorporate healthy eating a few days a week, you can easily do so.

Shrimp Fried Rice

Walker, who also authored the New York Times best-selling Danielle Walker’s Against All Grain: Meals Made Simple, likes to take classics that we love—think lasagna, apple crisp, fried chicken (yes, fried chicken), sloppy Joes and chicken pot pie and made them healthy and full of flavor.

“I’m always looking for ways to incorporate more vegetables into my family’s meals, and using riced cauliflower in this fried rice recipe inspired by Chinese takeout is a great way to do it,” she writes in her description of one of her super easy recipes (though I cheated and used soy sauce instead of coconut aminos and also bought rice cauliflower instead of doing my own). “The salty sauce can make any vegetable taste appealing, and this dish is pretty much all veggies. While it’s super-simple to make cauliflower rice at home, many supermarkets sell fresh or frozen riced cauliflower, so that’s what I use more often than not. Go ahead and use it straight from the freezer; there’s no need to thaw it first.”

Chocolate Zucchini Muffins

I’ve cooked several recipes out of this cookbook which I just received and all of them have turned out great—helping me keep my New Year’s resolution of eating healthier.

Shrimp Fried Rice

Serves 4 to 6 ·

11⁄2 pounds jumbo raw shrimp, peeled and deveined, with tails removed

6 tablespoons coconut aminos (see note below)

2 tablespoons toasted sesame oil

1 head cauliflower, cut into florets

5 tablespoons avocado oil

1⁄2 small yellow onion, minced

3 cloves garlic, minced

2 teaspoons peeled and minced fresh ginger

1 carrot, diced

2 eggs, beaten

11⁄4 teaspoons fine sea salt

1⁄4 cup frozen peas

2 green onions, tender green tops only, chopped

Combine the shrimp, 1 tablespoon of the coconut aminos, and 1 tablespoon of the sesame oil in a bowl.

Place the cauliflower in a food processor fitted with the grating attachment, or use the large holes on a box grater, and process the florets into rice-size pieces. Pick out any large fragments that didn’t shred and chop them up by hand with a knife or save for another use. You should have around 3 cups riced cauliflower.

Heat 2 tablespoons of the avocado oil in a wok over medium- high heat. Add the onion, garlic, and ginger and cook, stirring continuously with a wooden spoon, for 2 minutes, until fragrant. Add the carrot and cook, stirring continuously, for 2 minutes. Add the remaining 3 tablespoons avocado oil and the cauliflower and cook, stirring occasionally, for 4 minutes more. Transfer the cauliflower mixture to a plate and return the wok to the heat.

Add the shrimp mixture to the wok and sear for 1 minute per side, until pink all over and just cooked through. Transfer the shrimp to the plate with the cauliflower and return the wok to the heat.

Pour the eggs into the wok and stir to scramble them for 10 seconds, until mostly cooked through. Pour the cauliflower mixture and shrimp back into the wok and add the remaining 5 tablespoons coconut aminos, the remaining 1 tablespoon sesame oil, and the salt. Stir in the peas and cook for 1 minute longer. Top with the green onions and serve immediately.

Note: Coconut aminos, which are available at some local grocery stores or can be ordered online, are a Paleo substitute for soy sauce and still deliver the same salty tang, only they contain no soy and no wheat. If you’d rather just stick with soy, use the same amount as the coconut aminos.

Chocolate-Zucchini Muffins

Makes 24 · These muffins are moist and fluffy plus they’re nut free writes Walker, who keeps them in the freezer for a quick breakfast when the family’s frazzled and trying to get out the door for school. If zucchini isn’t in season, you could use shredded carrots.

11⁄2 cups shredded zucchini

8 eggs

1 cup unsweetened applesauce

1 cup pure maple syrup

2⁄3 cup coconut flour

1⁄2 cup unflavored collagen peptides powder or protein powder of your choice (optional)

1⁄2 cup raw cacao powder

6 tablespoons arrowroot powder

1 tablespoon baking soda

1 teaspoon ground cinnamon

1⁄4 teaspoon ground nutmeg

1⁄2 teaspoon fine sea salt

1⁄2 cup dairy-free chocolate chips (optional)

Preheat the oven to 350°F and line two 12-cup muffin tins with baking cups, or grease the tins with coconut oil. Line a plate with paper towels.

Place the zucchini on the prepared plate and allow it to drain some of its moisture while you make the batter.

Place the eggs, applesauce, and maple syrup in a stand mixer fitted with the beater attachment or use an electric handheld mixer. Mix on medium speed until combined. Add the coconut flour, collagen peptides powder, cacao powder, arrowroot, baking soda, cinnamon, nutmeg, and salt and mix on medium speed until combined.

Wrap the paper towels around the zucchini and give it a light squeeze to remove any remaining moisture. Add the zucchini to the batter along with 1⁄4 cup of the chocolate chips and mix on low speed until incorporated. Divide the batter evenly among the muffin cups, filling each two-thirds full. Sprinkle the remaining chocolate chips over the top.

Bake for 22 to 25 minutes, until a toothpick inserted into the center of a muffin comes out clean. Remove the muffins from the pan and allow them to cool completely on a wire rack before serving or storing.

Freeze in a single layer on a rimmed baking sheet, tightly covered with plastic wrap, for 4 hours. Place the frozen muffins in an airtight container and freeze for 4 months. To eat the muffins directly from the freezer, heat them in a 350°F oven for 10 minutes, until warmed through. Or, defrost in an airtight container in the fridge overnight, or for up to 1 week. If you prefer, warm on a baking sheet in a 400°F oven for 2 to 3 minutes.

The recipes above are from Danielle Walker’s Eat What You Love: Everyday Comfort You Crave Copyright © 2018 by Simple Writing Holdings, LLC. Published by Ten Speed Press, an imprint of Penguin Random House.

Eataly: All About Pasta: A Complete Guide with Recipes

The largest marketplace of all things doing with Italian edibles in the U.S., the 63,000-square-foot Eataly in Chicago is a mecca for food lovers, a vast space crowded with a variety of venues including unique specialty restaurants, stalls selling meat, cheese, breads, sweets and fish (though really stall is too plebian a term—these are sparkling and enticing places where you can get lost for seemingly hours looking at all the delectable offerings), rows of olive oils and wines and even a Nutella Bar (be still my beating heart). One of more than 40 worldwide concepts, Eataly Chicago, owned by Joe Bastianich and Mario Batali,  not only offers a plethora of ingredients, classes and events but also an expanse of cookbooks including the second in their Eataly series, All About Pasta: A Complete Guide with Recipes (Rizzoli 2018; $25).EatalyPasta_p027 btm

With the guiding philosophy of “the more you know, the more you enjoy,” this book immerses readers into a world of pasta from the easily recognizable—spaghetti and linguine—to the rarely found and more esoteric—maltagliati (translation: badly cut), mallopredus (pasta dough with saffron) and tajarin—thin egg pasta strands also known as taglierini. Of course, you’re never going to learn all the different types of pasta  because even the experts don’t know since no one has successfully completed a survey of all the pasta shapes in the world. There are simply too many different shapes and multiple names for each.EatalyPasta_p123

But there are ways of differentiating one from another and how to use them in creating delicious meals which the book shares. Take long and short pastas. As a basic rule, long dried semolina pasta pairs with oil-based sauces, smooth tomato sauces and seafood. Tube-shaped semolina pasta, known as la pasta tubolare, with its hollow centers, is perfect for capturing the ingredients used in the sauce.EatalyPasta_p049

Le pastine or small pasta is most often cooked in either broth or chunky soups.  Other pasta types include le perle del Mediterraneo–semolina pastas made by rubbing hard wheat flour with water until small balls form, cereali antichi is made with heirloom or ancient grains, while croxetti ot corzetti is the name for two different types of pasta that are pressed or stamped rather than rolled out.

We told you was complicated and it gets even more so as the book explores the different types of flours used for making pasta, the different sauces and il tocco finale—the finishing touch which can be such flavorful ingredients as cheese, basil, spicy chili oil or just a handful of minced flat leaf parsley to add a bright herbaceous flavored to almost any dish.EatalyPasta_p071 btm copy

The wonders of this book, with its immense amount of information as well as recipes, is that you can go deep or you can just choose the information you want. Either way, you’ll end up knowing a lot more about pasta—”a world fashioned out of flour and water.”

The following recipes are courtesy of Eataly.

Vesuvio al Ragu di Salsiccia e Scarola

Vesuvio Pasta with Sausage Ragu and Escarole

Serves 12

12 ounces sweet sausage

1 tablespoon red wine

One cup tomato puree

½ cup chicken or beef stock

3 cup shredded escarole

Find sea salt to taste

Coarse sea salt for pasta cooking water

1 pound Vesuvius pasta or other short pasta preferably with a complex shape

3 tablespoons extra virgin olive oil

Grated Romano, pecorino or parmesan cheese for serving

Remove the cost sausage casings and crumble the meat into a bowl. Sprinkle the wine over the meat and massage the wine into the meat by hand until it is soft and elastic, about two minutes about two minutes.

Place the meat in the cold skillet with high sides. Placed the skillet over low heat and slowly cook the meat until it’s no longer raw looking., about two minutes. Do not brown the meat.

At the tomato puree and stir to combine. Increase the heat until the tomato puree is simmering gently.

Pour in the stock, stir once, and decrease the heat until the ragu is at a very gentle simmer, with a bubble just occasionally breaking the surface. Simmer uncovered without stirring for two hours. The meat should poach in the liquid and turn very soft.

When the sauce is cooked, carefully spoon off and discard any liquid remaining on the top. Stir in the escarole and cook until just wilted, about two minutes. Season to taste with sea salt. Remove from heat.

Bring a large pot of water to boil for the pasta. When the water is boiling salted add the pasta. Cook until the pasta is al dente. Smear a small amount of the sauce on the bottom of the warm pasta serving bowl. Then transfer it immediately to the serving bowl. Top with remaining sauce and toss vigorously to combine. Drizzle on the olive oil and toss again. Serve immediately with grated cheese on the side.

Spaghettoni al Tonno (Pasta with Tuna)

Yield: 4 servings

1 pound spaghettoni (or bucatini)

1 (7-ounce) jar Italian tuna preserved in olive oil, drained

2 tablespoons salted capers, rinsed & drained

2 tablespoons plus 1 teaspoon extra virgin olive oil

¼ cup breadcrumbs

1 yellow onion, minced

1 clove garlic, sliced

1 Calabrese chili pepper in olive oil, drained & minced

Zest of 1 lemon, grated

Coarse sea salt, to taste

Place 2 tablespoons of the olive oil in a large pan over medium-low heat. Add the onion, garlic, and chili pepper and cook, stirring frequently, until the onion and the garlic are golden. Flake the tuna into the pan, and cook until heated through, about 2 minutes. Stir in the capers and the lemon zest, and remove from the heat.

Toss the breadcrumbs with the remaining olive oil, and toast in a toaster oven or cast-iron skillet over medium heat until crisp.

Meanwhile, bring a large pot of water to a boil. Add the sea salt and spaghettoni. Cook, stirring frequently with a long-handled fork, until the spaghettoni is al dente.  Drain, reserving about 1 cup of the cooking water.

Transfer the pasta to the pan with the tuna. Toss vigorously over medium heat until combined, about 2 minutes. If the pasta looks dry, add a small amount of the cooking water, and toss until it looks moist.

Garnish with the toasted breadcrumbs, and serve immediately. For another taste of Calabria, repeat tomorrow.

Eataly Chicago

Eataly: All About Pasta

Sister Pie: The Recipes and Stories of a Big-Hearted Bakery in Detroit

Lisa Ludwinski, owner of Sister Pies, began her business in her parents’ kitchen in Milford, Michigan, making pies and cookies.  Within a year, the demand for her baked goods was such that she determined to open a bricks and mortar store. The problem? Money, of course. Winning the Comerica Hatch Detroit Contest which awards up-and-coming entrepreneurs a $50,000 grant was a great start.

brandy pecan pie
Reprinted with permission from Sister Pie,  copyright © 2018 Photography by E. E. Berger. Published by Lorena Jones Books, an imprint of Penguin Random House


But Ludwinski still needed more to achieve her dream. Her solution? Hold a 24-hour Dance-A-Thon with the pledge to raise $25,000 by dancing from 9 p.m. on a Friday night to the same time  the following night. 11 hours later she’d raised $25,335 and by the end of her dancing, the total was $26,135, Now the award winning Sister Pie is so popular that Ludwinski is planning on opening a second location. Her bakery abuzz and her first cookbook Sister Pie: The Recipes and Stories of a Big-Hearted Bakery in Detroit (Lorena Jones Books 2018; $25) recently released, Ludwinski embarked upon a month long book tour that includes a stop on November 2, at Granor Farm in Three Oaks, Michigan just a few miles north of the Indiana state line.

Granor Farm 2018 Farm Dinner. Three Oaks, Michigan
Photo courtesy of Jamie and Eric Photography

“Lisa’s visit is part of our Book + Supper Club Series, where I build a menu around the author’s work,” says Abra Berens, Chef at Granor Farm. “For me it continues Granor’s original mission to be a place of continued education, especially around food. We started the farm primarily to offer our Farm Camp for kids. That emphasis on education–and food–was part of my initial interest in what Granor was doing. It is a great way to share the knowledge of various experts in the field and, personally, for me to continue to grow as a chef by working with other amazing talents.”

Berens says the dinner will be a mixture of Ludwinski’s recipes and her own interpretation of those recipes.

apple sage gouda
Reprinted with permission from Sister Pie,  copyright © 2018 Photography by E. E. Berger. 

“At the start we will give a brief overview of Granor Farm and then give Lisa the floor to talk about her bakery, her book, and her general outlook on life,” she says, noting that she is a big fan I’m fan of what Ludwinski does.

Lisa with pie
Reprinted with permission from Sister Pie,  copyright © 2018 Photography by E. E. Berger. 

Ludwinski, who grew up in Milford and studied Theatre Arts at Kalamazoo College, originally moved to New York to become a director but gravitated instead to baking before returning home to start her own business. Savvy with social media(she has almost 49,000 followers on Instagram (@sisterpiedetroit) and a happy, fun-filled personality, Ludwinski isn’t afraid to mix it up, creating a delicious blend of sweet or savory and sweet and savory pies such salted maple pumpkin, strawberry rhubarb lavender and apple sage gouda. Also on her menu are scones, muffins and cookies. But when she says she uses seasonal, she’s serious.

sweet potato coconut
Reprinted with permission from Sister Pie,  copyright © 2018 Photography by E. E. Berger. Published by Lorena Jones Books, an imprint of Penguin Random House.


“There’s no apple pie in May and there’s no cherry pie in December,” she says. “The reason why is it tastes better. That takes people a little while to get used to, but usually when they taste whichever pie we have available, they understand. Working with the seasonal structure allows us to be super creative, too. If I know I’ve got rhubarb, then I can ask myself – ok, what will make a rhubarb pie unique? We love to pair the seasonal ingredients with herbs, floral tones, alternative flours, citrus, nuts, cheese, etc. Basically everything that’s delicious to eat. We’re also big on the sweet-and-salty.”

Those combinations include oatmeal raisin or chocolate chip cookies with a flake or two of sea salt on top and black pepper tarragon and honey shortbread.Jamie and Eric Photography

019GranorDinner2018 (1)
Photo courtesy of Jamie and Eric Photography

Community and people working together is important says Ludwinski.

“That’s another reason we’re not getting strawberries from some huge farm in California that grows them all year long–we’re getting them from Norm who runs a small farm in Ida, Michigan,” she says. “His strawberries are fleeting and delicious, and a special treat.”

_AUTHOR PHOTO Lisa Ludwinski (credit E.E. Berger) (1)
Reprinted with permission from Sister Pie,  copyright © 2018 Photography by E. E. Berger. Published by Lorena Jones Books, an imprint of Penguin Random House.

Sister Pie, 8066 Kercheval, Detroit. (313) 447-5550; sisterpie.com

Ifyougo:

What: Granor Farm Book + Supper Club with Lisa Ludwinski

When: Friday, November 2, 5:30-9 CST

Where: Granor Farm, 3480 Warren Woods Road, Three Oaks, MI

Cost: $95 a ticker which includes dinners and a copy of Sister Pie.

FYI: granorfarm.com

The following recipes are courtesy of Sister Pies.

Apple Sage Gouda Pie

Makes one 9-inch pie

2 pounds Northern Spy, Idared, or Golden Delicious apples, peeled and sliced

1 teaspoon freshly squeezed lemon juice

3⁄4 cup granulated sugar

2 tablespoons minced fresh sage

1⁄4 cup packed light brown sugar

1⁄4 cup tapioca starch

1⁄4 teaspoon ground cinnamon

1⁄2 teaspoon ground nutmeg

1⁄4 teaspoon kosher salt

1 disc Aged Gouda Pie Dough (see below), rolled out and fitted into a 9-inch pie pan but uncrimped, and refrigerated

6 lattice strips made with Aged Gouda Pie Dough, placed on a parchment-lined baking sheet and refrigerated

1 teaspoon turbinado sugar mixed with 1 teaspoon all-purpose flour

2 tablespoons (1⁄4 stick) unsalted butter, cubed and chilled

1 large egg, beaten

For the filling:

Transfer the apples to a large mixing bowl and toss with the lemon juice.

In a medium bowl, combine the granulated sugar and sage, massaging together with your fingertips. Add the brown sugar, tapioca starch, cinnamon, nutmeg, and salt. Add to the apples and toss with your hands until evenly distributed.

When you’re ready to assemble the pie, remove the unbaked crust and lattice strips from the refrigerator. Sprinkle the sugar-flour mixture all over the bottom of the crust. Layer the apples on top, being careful not to mound them in the center. Dot the apples  with butter cubes.

Place one strip of lattice  across the center of the pie. Take another strip and lay it on top, perpendicular to the first one, creating a cross. Lay the next two strips on either side of the first strip you laid down, so they are parallel to both each other and the original strip. Next, working with the original strip, fold back both ends toward the center, and then place the last two lattice strips down on either side of the second (perpendicular) strip. Fold the original strip back down, so that it lies across and on top of the newly placed strips. It should look like a woven lattice.

Tear off the ends of the lattice pieces so they are flush with the perimeter of the tin. Roll the edge of the crust in, sealing the lattice. Crimp, using the technique described on page 49, being careful to push the crimps down and into the pie, as opposed to keeping them too loose on the edge. Put the assembled pie in the freezer for a 15-minute rest.

Preheat your oven to 450°F. Line a baking sheet with parchment paper.

Remove the pie from the freezer, place on the baking sheet, and brush the lattice and crimped edge with the beaten egg. Transfer the baking sheet with the pie on it to the oven and bake for15 to 20 minutes, or until the crust is evenly golden brown. Turn the temperature down to 325°F and continue to bake for 50 to 70 minutes, until the pie juices are bubbling in the center.

Remove the baking sheet from the oven and transfer the pie to a wire rack to cool for 4 to 6 hours. When the pie is at room temperature, slice it into 6 to 8 pieces and serve.

Store leftover pie, well wrapped in plastic wrap or under a pie dome, at room temperature for up to 2 days.

Aged Gouda Pie Dough

2 1/2 cups all-purpose flour

1 teaspoon granulated sugar

1 teaspoon kosher salt

1 cup (2 sticks) unsalted European-style butter, straight from the fridge

1 ounce aged Gouda, grated

1⁄2 cup ice-cold water and apple cider vinegar mixture, or more if needed

In a large stainless steel bowl, combine the flour, sugar, and salt  and stir to mix well. Place the sticks of butter in the bowl and coat on all sides with flour. Using a bench scraper, cut the butter into 1⁄2-inch cubes. Work quickly to separate the cubes with your hands until they are all lightly coated in the flour mixture. Grab that bench scraper once again and cut each cube in half.

Switch to the pastry blender and begin  to cut in the butter with one hand while turning the bowl with the other. It’s important not to aim for the same spot at the bottom of the bowl with each stroke of the pastry blender, but to actually slice through butter every time to maximize efficiency. When the pastry blender clogs up, carefully clean it out with your fingers (watch out, it bites!) or a butter knife and use your hands to toss the ingredients a bit. Continue to blend and turn until the largest pieces are the size and shape of peas and the rest of it feels and looks freakishly similar to canned Parmesan cheese. Speaking of cheese, now is the time to add the Gouda and mix it in quickly with the pastry blender until it is evenly distributed.

At this point, add the water-vinegar mixture all at once, and switch back to the bench scraper. Scrape as much of the mixture as you can from one side of the bowl to the other, until you can’t see visible pools of liquid anymore. Now it’s hand time. Scoop up as much of the mixture as you can, and use the tips of your fingers to press it back down onto the rest of the ingredients. Rotate the bowl a quarter-turn and repeat.

Scoop, press, and turn. With each fold, your intention is to be quickly forming the mixture into one cohesive mass. Remember to incorporate any dry, floury bits that have congregated at the bottom of the bowl, and once those are completely gone and the dough is formed, it’s time to stop.

Remove the dough from the bowl, place it on a lightly floured counter, and use your bench scraper to divide it into two equal pieces. Gently pat one into a 2-inch-thick disc, working quickly to seal any broken edges before wrapping it tightly in a double layer of plastic wrap. Pat the other half into a 6-by-3-inch rectangle.

Refrigerate the dough for at least 2 hours or, ideally, overnight. When you go to roll out the crust, you want the disc to feel as hard and cold as the butter did when you removed it from the fridge to make the dough. This will make the roll-out way easier.

Makes enough for one 9-inch lattice-topped pie.

Jane Simon Ammeson can be contacted via email at janeammeson@gmail.com

All photos of Lisa Ludwinski and her pies are:

Reprinted with permission from Sister Pie,  copyright © 2018 Photography by E. E. Berger. Published by Lorena Jones Books, an imprint of Penguin Random House


Tiffani Thiessen Pull Up a Chair


Honey-Ginger Chicken Wings (c) Rebecca Sanabria
Photography © 2018 by Rebecca Sanabria. Reproduced by permission of Houghton Mifflin Harcourt. All rights reserved.

Only six or so when she started helping out in the kitchen, Tiffani Thiessen grew up in a family where dinners were a gathering time to enjoy great cooking and conversations. She upped her game from traditional American fare when she and other stars from “Saved by the Bell” toured in Europe.

“It definitely impacted me,” says Thiessen who played Kelly Kapowski on the hit TV show and was 16 at the time. “I learned all about wine, cheese and all types of different foods when we traveled in France, Italy and Holland.”

This love of food and conviviality was so intense that though Thiessen continued with her acting career (she was Valerie Malone on “Beverly Hills 90210” and currently stars in “Alexa & Katie”) she also segued into cooking,  hosting the long running “Dinner at Tiffani’s” on the Cooking Channel. As if that wasn’t enough to keep any mom of two young children busy enough, Thiessen has spent the last three years writing Pull Up a Chair: Recipes from My Family to Yours (Houghton Mifflin Harcourt $30), which will be released on October 2.

Describing cooking as therapeutic as well as artistic and creative, Thiessen’s recipes include new dishes, those she collected through the years and family favorites, some that she tweaked including her mom’s beef stroganoff which the family ate once a week when she was young.

“I wasn’t a big fan,” says Thiessen, adding that her mom’s stroganoff was very traditional and included stirring sour cream in at the end so that it took on the appearance of dog food—her words not ours, Mrs. Thiessen. Tiffani’s tweaked it into a beef and mushroom Stroganoff with creamy polenta, spinach and a touch of brandy. The sour cream is served on the side.

Did that hurt you mom’s feelings? I ask.

“No, I have one of the most supportive families,” she says.

Tiffani & Mom Making Mom's Cream Cheese Pie (c) Rebecca Sanabria
Tiffani and her mother making cheesecake Photography © 2018 by Rebecca Sanabria. Reproduced by permission of Houghton Mifflin Harcourt. All rights reserved.

There’s also a cowboy twang to some of her dishes such as the short rib beef enchiladas and three cheese queso, since husband Brady Smith is a meat-loving Texas boy. Her son Holt gobbles up her mac and cheese and Thiessen says Harper her eight-year-old daughter loves to decorate pizzas.

“I don’t think of myself as anything but a home cook and my recipes are easy but everything I cook is with love and passion and that’s what Pull Up a Chair is all about,” says Thiessen, who, during our phone interview, calls me sweetheart and dear.

That friendliness as well as the sumptuousness of her cookbook—125 recipes and lots of full page color photos of both luscious-looking food and family (and yes, her husband is handsome and her children adorable), makes me long to get an invitation to dine at her house.

Pickle & Potato Salad (c) Rebecca Sanabria
Photography © 2018 by Rebecca Sanabria. Reproduced by permission of Houghton Mifflin Harcourt. All rights reserved.

Since that won’t be happening, I did a little pre-interview stalking watching videos of Thiessen cooking in her kitchen and then displaying part of her cookbook collection.

“I love cookbooks, I love the look, the aesthetics of them” she says when I mention my sleuthing. “Most people I’m close to would say I have a problem.  I don’t use some of them that much, as my husband points out, but there’s just something I like about having them around.”

I can identify with that having heard similar comments from both my husband and daughter. Another reason to get that dinner invitation. But until then, I have the cookbook and can create the recipes in my own home.

Pickle & Potato Salad

Serves 6

1½ pounds tricolored small potatoes

1½ teaspoons kosher salt, plus more for the potatoes

½ cup mayonnaise

¼ cup chopped sweet pickles

3 tablespoons pickle juice (from the jar)

1 tablespoon yellow mustard

¼ teaspoon freshly ground black pepper, plus more to taste

5 hard-boiled eggs, peeled and chopped

½ medium red onion, thinly sliced

2 tablespoons chopped fresh parsley, for garnish

Paprika, for garnish

Place the potatoes in a large pot and add enough cold water to cover them by 1 inch and a generous pinch of salt. Bring the water to a boil over medium-high heat and cook until the potatoes are fork-tender, 20 to 25 minutes. Drain the potatoes and let them rest until they’re cool enough to handle. Cut each one in half.

In a small bowl, mix together the mayonnaise, sweet pickles, pickle juice, mustard, salt, and pepper.

In a separate large bowl, combine the halved potatoes, eggs, and red onion and toss with the dressing. Taste, adjust the seasoning, and garnish with the parsley and paprika.

Honey-Ginger Chicken Wings

Serves 6 to 8

½ cup honey (preferably wildflower or mesquite)

¼ cup tamari or soy sauce

3 tablespoons toasted sesame oil

2 tablespoons grated fresh ginger

2 scallions, thinly sliced, plus more for garnish

3 garlic cloves, minced

Grated zest and juice of 1 lime, plus more zest for garnish

Kosher salt and freshly ground black pepper

16 chicken wings (about 4 pounds), tips removed, drumettes and flats separated

In a medium bowl, whisk together the honey, tamari, sesame oil, ginger, scallions, garlic, lime zest, lime juice, ¼ teaspoon salt, and ¼ teaspoon pepper. Reserve ¾ cup of the mixture in the fridge.

Pour the remaining marinade into a 2-gallon zip-top bag. Add the chicken and seal the bag, pressing out as much air as possible. Massage the marinade into the wings. Refrigerate for at least 6 hours, preferably overnight. Before cooking, let the wings stand at room temperature for about 2 hours

When ready to cook the wings, preheat the oven to 400°F. Line a large baking sheet with parchment paper.

Remove the wings from the marinade, reserving the marinade. Season the wings with salt and pepper and place them skin-side down in a single layer on a large rimmed baking sheet. Spoon some of the marinade over them; discard the remaining marinade. Bake for 20 minutes. Remove from the oven and flip the wings, basting with the pan drippings. Rotate the pan and bake for another 20 to 25 minutes, until the honey has caramelized and the skin is a dark amber color.

In a small saucepan, bring the reserved ¾ cup marinade (from the fridge) to a boil over medium-high heat. Cook until the liquid turns into a thick, syrupy glaze, about 4 minutes.

Coat the wings with the glaze, arrange them on a serving platter, and garnish with scallions and lime zest.

These recipes are excerpted from Pull Up a Chair © 2018 by Tiffani Thiessen. Photography © 2018 by Rebecca Sanabria. Reproduced by permission of Houghton Mifflin Harcourt. All rights reserved.

Ifyougo:

What: Tiffani Thiessen will be at two Chicago locations signing copies of her debut cookbook, Pull Up a Chair.

When: Thursday, October 4 at 8 pm (EST)

Where: Anderson’s Bookshop, 123 W. Jefferson Ave., Naperville, IL

Cost: $33 includes copy of the book, a place in the signing line, a chance to meet Thiessen and have you photo taken.

FYI: 630) 355-2665; andersonsbookshop.com

When: Friday, October 5th at 7 pm (EST)

Where: Williams-Sonoma, Lincoln Park

1550 N. Fremont St., Chicago, IL

Cost: $31.89 includes copy of book

FYI: (312) 255-0643; williams-sonoma.com/stores/us/il/chicago-lincoln-park/

You can follow Thiessen at tiffanithiessen.com

Excerpted from Pull Up a Chair © 2018 by Tiffani Thiessen. Photography © 2018 by Rebecca Sanabria. Reproduced by permission of Houghton Mifflin Harcourt. All rights reserved.

Ann Arbor vibe: Where social consciousness meets creativity

There’s a definite vibe in Ann Arbor — one where social consciousness and creativity converge. And so I mapped out interesting places in the eclectic Westside to immerse myself in all this trendy city has to offer.zingerman camp bacon t-shirt

A first stop is the Selma Cafe, located in the home of Jeff McCabe and his wife, Lisa Gottlieb. The cafe is open Friday for breakfast in their historic home. Local chefs, such as cookbook author Max Sussman, formerly a chef at Zingerman’s and the now-closed Eve who is now chef and co-owner of Samesa Restaurant in Williamsburg, volunteered to create wonderful meals using local ingredients, sometimes serving up to 180 meals during the event.

On a mission

Proceeds from these breakfasts support the area’s Community Sustainable Agriculture operations, including building hoop houses — inexpensive structures that continue the growing season once the weather turns cold.

A moveable feast

DSC_0082

At my next stop, I eat freshly baked Welsh scones topped with Devonshire cream and housemade plum and vanilla rooibos tea jam at the elegant TeaHaus, on Fourth Street north of the downtown. The TeaHaus features a wall of drawers filled with more than 200 varieties of tea leaves from around the world.

Also on the same street is the People’s Food Co-op, a community-owned natural foods grocery store, where customers can stock up on at least three types of kale and four varieties of sprouts, among other items, and enjoy a Fair Trade coffee and meal at its Cafe Verde.

Across the street is Fourth Ave Birkenstock selling the low-carbon transportation alternative with just two moving parts and featuring one of the few in the nation to have a Birkenstock shoe repair team.

Around the corner on Ann Street is Vicki’s Wash & Wear Haircuts & Heavenly MetalDSC_0316 (1), a gallery and gift shop featuring a range of global art works, including furniture, jewelry, clothing, purses, shoes and gift items. Tucked away in a front corner of the store is the lone salon chair where you can get your hair cut by owner Vicki Honeyman, a film school graduate who morphed into hair styling and retail more than a decade ago.

Later, I drink lattes with Ari Weinzweig, a Russian history major who eschewed grad school and instead co-founded Zingerman’s Deli, which grew into the food empire of seven businesses. The food emporium features expensive imported olive oils, freshly baked breads, retro pimento cheese and chopped chicken liver. Each year, 10 percent of sales go toward community projects and another 5 percent goes into a community chest for employees.DSC_0047

Though so far I’ve been able to walk to all these places, all within a radius of a few blocks, for my next stop I hit the road to chat with Alex Young, the James Beard Award-winning chef at Zingerman’s Road House, part of Zingerman’s mega-business, which is located off the Jackson Avenue, Exit 172 of I-94. Young not only creates fantastic meals, he also has a farm where he raises heirloom and organic produce and animals for his restaurant. Young’s next goal is to grow ancient grains such as farro, an Egyptian precursor to wheat.DSC_0188

A jump onto the interstate and a few miles later on the southeast side of town I’m at Motawi Tileworks, where owner/designer Nawal Motawi creates tiles using local clays and glazes mixed on site and offers tile-making workshops.

At dinner that night, chef/owner Brandon Johns of the farm-to-table restaurant Grange Bar & Kitchen in downtown Ann Arbor is serving one of his best-selling menu items — fried pig’s head served with gribiche, a French mustard mayonnaise sauce. I don’t ask for the recipe, but Johns, who stops by my table, gives me a brief description anyway, including such steps as boiling and then removing the meat from a pig’s head. I sigh with relief to learn that eyeballs are not part of the recipe. Trust me, you don’t want to know any more about the process, but the dish is delicious.DSC_0059

Creating a custom tour is easy. Go to the Ann Arbor Area Convention and Visitor Bureau’s website, visitannarbor.org, and make a list of what sounds intriguing. It’s a wonderful way to while away a day with an adventure both enriching and enlightening.

Chorizo with Blue Cheese and Dates

Courtesy of Chef Brandon Johns, Grange Kitchen & Bar

1 pound Spanish style dried chorizo sausage

½ pound blue cheese, Cabrales is recommended

8 Medjool dates, pitted and halved

Toothpicks or skewers

Preheat oven to 375 degrees

Slice chorizo into 16 pieces and lay flat on cutting board. Fill center of date with cheese and place cut side of date on top of each chorizo. Skewer each chorizo with toothpick.

Place skewers on baking sheet and place in oven for 3 to 5 minutes, until sausage is warm and cheese is a little melted. Serve immediately.

Zingerman’s Roadhouse Mac & Cheese

Courtesy of Chef Alex Young

Coarse sea salt

1 pound macaroni

2 tablespoons butter

1/4 cup diced onion

1 bay leaf

2 tablespoons all-purpose flour

1 1/2 cups whole milk

1/4 cup heavy cream

1 teaspoon Dijon mustard

1 pound grated raw milk cheddar cheese

2 tablespoons olive oil

Bring a large pot of water to a boil. Add 1 to 2 tablespoons salt and the pasta and stir well. Cook until the pasta is done. Drain and set it aside.

Melt butter for the sauce in a large heavy-bottomed pot over medium-high heat being careful not to scorch the butter. Add the onion and bay leaf and sauté until the onion is soft, about 5 minutes.

Remove the bay leaf. Add the flour, and cook for a minute or so, stirring constantly.

Slowly add the milk, a little at a time, stirring constantly to avoid lumping. When the flour and milk have been completely combined, stir in the cream. Keep the mixture at a gentle simmer (not at a high boil) until it thickens, 2 to 3 minutes.

Reduce the heat to medium. Stir in the mustard, cheddar cheese and salt to taste. Simmer for 5 minutes and set aside.

In a heavy bottom skillet over med-high heat, get the pan very hot. Add olive oil and when it begins to smoke add the cheese sauce and the drained cooked noodles. Toss thoroughly and continue to cook, stirring occasionally until you have approximately 15 % of the mixture golden brown. Taste and adjust the seasonings if necessary. Remove from heat.


Crazy Sista Cooking: Cuisine & Conversation with Lucy Anne Buffet

Lucy-8690-smWhen my daughter was in high school, I drove her and a friend down to Gulf Shores, Alabama for spring break. While we were there, a friend insisted we go to Lucy Buffet’s Lulu’s Gulf Shores, a bayside beach restaurant. I was pretty sure, no make that positive, that this would be some kind of not-so-good-but-my-brother-Jimmy-is-a-major-celebrity type of place. The good thing, I thought when we sat down in the very crowded main dining room was that we could see dolphins frolicking out in the water from our screened in, over-sized window. That would make the bad food worth it.

37121568_10156143633092713_5753391619667656704_n

Okay, so I totally misjudged what Lulu’s was all about. The food was delicious, whatever was fried was done just right—not greasy or heavy—and there were plenty of other options on the menu that were delicious like the crab melt, Crazy Sista’s Juicy Pot Roast Sandwich (yes, indeed, pot roast), gumbo, Lulu’s Jerk Chicken Quesadillas and, of course, this being the south, fried okra and fried hushpuppies (both of which were wonderful). I was given a copy of her cookbook, Crazy Sista Cooking: Cuisine & Conversation with Lucy Anne Buffet (Grand Central Life & Style) that included a foreword by brother Jimmy. Crazy Sista is Lucy Anne’s nickname. Now Buffet also has restaurants in Destin, Florida and Myrtle Beach, South Carolina and several other cookbooks including LuLu’s Kitchen: A Taste of the Gulf Coast Good Life and Gumbo Love: Recipes for Gulf Coast Cooking, Entertaining, and Savoring the Good Life. Many of the zippy recipes are the same with new ones added. For the fried oyster recipe Dave requested, I included Mama’s Favorite Oyster Loaf. Instead of oysters, you can use fried shrimp or even fried veggies instead.

39953590_10156241899637713_2358163720992980992_n

The recipe calls for making a lot of the ingredients such as her Sweet and Sassy Icebox Pickles and Lulu’s Crazy Frying Cornmeal. I’ve included those recipes, thinking you can plop the pickles in the refrigerator and eat them at other times and save the left over cornmeal mix as well. But if you’re in a hurry, feeling lazy or just want to make it simple, you can just find comparable ingredients at the grocery store.   And since it’s good to have an accompaniment, I’ve included Lulu’s recipe for Sweet Tomato Pie.

The following recipes are from LuLu’s Kitchen: A Taste of the Gulf Coast Good Life by Lucy Anne Buffet (Grand Central Life & Style, $20).

Listen to Lucy talk about Gumbo Love.

Mama’s Favorite Oyster Loaf

Makes 4 sandwiches

1 quart oysters

4 (8-inch) New Orleans-style French bread or 1 baguette, cut into four pieces

2 to 3 tablespoons butter, softened

Mayonnaise to taste

Lettuce leaves

2 medium tomatoes, sliced

Sweet and Sassy Icebox Pickle slices (recipe below)

Hot Pepper Sauce

Preheat oven to 200 degrees.

Fried oysters (see recipe below)

Preheat oven to 200 degrees.

Fry oysters in batches and place cooked oysters in oven to keep warm.

Slice bread horizontally, about three-fourths of the way through, leaving one edge intact.

Spear a little butter on inside surface of French bread and toast. I like to place mine face-down on a warm skillet or grill.

Spread mayonnaise on toasted read.

Layer lettuce, tomato slices and pickles on bottom side of the bread. Top with fried oysters, using about eight oysters per sandwich.

Add a few dashes of hot sauce to taste.

Cut into halves or quarters depending upon the bread you’re using and serve.

Sweet and Sassy Icebox Pickles

1 (1-gal.) jar whole kosher dill pickles, drained, cut into 1/4-inch-thick slices

4 cups granulated sugar

4 cups packed light brown sugar

1 cup apple cider vinegar

2/3 cup peeled, halved, and sliced fresh ginger

1/4 cup prepared horseradish

1 tablespoon crushed red pepper

1 tablespoon mustard seeds

1/2 teaspoon ground turmeric

4 medium-size yellow onions, thinly sliced

20 garlic cloves, sliced in half lengthwise

8 cinnamon sticks

Place all the ingredients in a big ol’ stainless steel bowl or large plastic food-safe container with an airtight lid. Using your hands, toss well. Cover and chill overnight. The pickles will reduce in volume, so the next day you can place in a very large jar or several small airtight containers for easier storage.

Refrigerate at least 1 week before using, turning topsy-turvy every day. Pickles are ready when sugar has dissolved and all dill flavor has vanished. Store in refrigerator up to 3 weeks.

Perfect Fried Oysters

Make Lulu’s Crazy Crying Cornmeal (recipe below) or use regular cornmeal.

6 cups peanut oil or enough to fill a skillet, about 2 inches deep

1 quart oysters, drained

Heat oil in cast iron skillet to 355 degrees or heat until a little flour flicked into the oil sizzles

Taking a few oysters at a time, dredge through cornmeal mixture coating thoroughly.

Gently drop into hot oil. Fry until golden brown turning once or until they float to the top. Drain on paper towels and serve immediately.

Lulu’s Crazy Frying Cornmeal

2 cups all-purpose white cornmeal

2 tablespoons Creole seasoning

1 tablespoon black pepper

½ teaspoon salt

Combine all ingredients and mix well.

Sweet Tomato Pie

Serves 6-8

2 tablespoons all-purpose flour

Pastry for 1 pie crust

2 tablespoons unsalted butter

1 tablespoon extra-virgin olive oil

1 large onion, thinly sliced

1 tablespoon sugar

4 cloves garlic, thinly sliced

4 ounces cream cheese, softened

1/2 cup mayonnaise

2 tablespoons heavy cream

1 tablespoon sour cream

1 tablespoon honey mustard

1 cup shredded Parmesan

4 green onions, including the green part, cut into 2-inch pieces

4 large red tomatoes, in 1/4-inch slices

1/2 teaspoon each kosher salt and coarsely ground black pepper

1/2 cup fresh basil, cut in ribbons

2 cups shredded Gruyere or Swiss cheese

Heat oven to 450 degrees. Sprinkle flour over work surface and roll pastry dough to fit a 7-by-11-inch baking dish, making sure dough comes up the sides of the dish. Poke bottom of crust with a fork in several places. Bake for 9 to 10 minutes or until lightly browned. Let cool. Reduce oven temperature to 400 degrees.

In a cast iron or heavy skillet, heat butter and olive oil over medium heat. Add onions and sugar; sauté until onions are very brown and caramelized. Add garlic and stir constantly for 1 to 2 minutes or until garlic is cooked through and tender. Remove onions and garlic from skillet and let cool.

Using a food processor, process cream cheese, mayonnaise, cream, sour cream, mustard, Parmesan and green onions until well mixed.

In the cooled pie crust, layer half the onions, cream cheese mixture, sliced tomatoes, salt, pepper, basil and Gruyere. Repeat. Bake for 35 minutes or until pie is bubbling and top is browned. Cool for 15 to 20 minutes before slicing.

Screen-Shot-2018-06-19-at-3.40.28-PMWHITE SANGRIA

Serves 4 to 6

1 (750-milliliter) bottle Pinot Gris or any other crisp light white wine

1/2 cup peach-flavored vodka

2/3 cup sugar

1/4 fresh pineapple, chopped into cubes

1/2 lemon, cut into wedges

2 fresh strawberries, chopped

1/2 mango, chopped into cubes

1 (8-ounce) can ginger ale

Ice cubes

In a very large pitcher, combine the wine, vodka, sugar, and fruit. Stir well. Let the ingredients steep in the fridge for 2 to 24 hours (the longer, the better).

Add the ginger ale and ice cubes about 30 minutes before serving.

Place a strainer over the mouth of the pitcher and pour to order. Garnish with any leftover fruit, such as more of the pineapple, lemon, strawberries, and mango.


Tastings: The Japan Pavilion at the National Restaurant Association Show

Several weeks ago, when the National Restaurant Association (NRA) was holding its IMG_4557annual international show, my friend Kimiyo Naka, who lives in Chicago, asked me to stop by the Japan Pavilion where 19 companies from that country were presenting a range of both modern and traditional Japanese foods and beverages. On hand also, were several Chicago restauranteurs including Bill Kim and Takashi Yagihashi, both of whom are awarding winning chefs and cookbook authors. The NRA show is immense, taking up several floors at McCormick’s Place in Chicago and is packed with vendors showcasing products and food, chefs doing cooking demonstrations and the latest in food technologies and equipment.

IMG_4554      My experience with Japanese food is limited, so stopping by the Japan Pavilion, presented by the Japan External Trade Organization (JETRO), was very much a learning experience. When Kimiyo and I tasted samples of Wagyu Beef, a top quality, highly marbled meat produced by four Japanese breeds of beef cattle and took sips of sake, we discovered how these foods are helping Japan’s rural areas in their revitalization efforts.  Some farmers and producers are creating their own brands and exporting—or working on exporting them to other countries including the United States.

We tasted sakes including brown rice sake and one made with shiraume, or white flower plums and looked at the different varieties of rice typically used to make sake, which is a fermented rice drink that is typically served warm. We also talked to a member of the Yonezawa family founders of Akashi Sake Brewery in 1886,  a small artisanal sake producer based in Akashi, a fishing town in the Hyogo prefecture (or district) in Western Japan which is the traditional sake brewing capital of country and is known for having the best sake rice and pure water.

IMG_4552     When the company started all those years ago more than a century ago, Akashi was a small village but since has grown into a booming metropolis. It’s known for the Akashi Kaikyo Bridge – the world’s longest suspension bridge—as well as the quality of the fish that are caught in the waters off its coast. The water also is a predominant feature in the taste of the sake, as are Japanese cedar wood lids used to cover the storage tanks where the Akashi sake is aged. Akashi sake is made in small batches by Toji Kimio Yonezewa. Note: I learned later that toji was not his first name but means brewmaster or chief executive of production.

I also spent time talking to Bill Kim, author of Korean BBQ: How to Kung-Fu Your Grill in Seven Sauces, who I had interviewed before and Takashi Yagihashi, who came to the U.S. from Japan when he was 16, started cooking because he need milk money, won the James Beard Foundation Award for Best Chef: Midwest and is the owner of Slurping Turtle in downtown Chicago (there’s another one in Ann Arbor, Michigan) and TABO Sushi & Noodles at Macy’s State Street in Chicago.IMG_4596 (2)

One of the things we talked about is karaage which is Japanese fried chicken. I’ve included his recipe for the dish. Don’t get put off with the title ingredient of duck fat (if you’re like me, you don’t have a ready supply of it in your refrigerator) because you can substitute vegetable oil instead.

Slurping Turtle’s Duck-Fat-Fried Chicken Karaage

4 chicken thigh quarters (thigh and drumstick)

2 cloves garlic, peeled and grated

1 tsp. fresh grated ginger

1/4 cup soy sauce

1/4 cup mirin or sweet sake

2 tsp. sesame oil

Salt and pepper

6 cups duck fat (or vegetable oil), enough to fill a pan 3 inches deep

1 cup potato starch

Using a sharp knife, separate the thighs from the drumstick by cutting between the joint. Cut the thigh in half lengthwise along the bone. Using a heavy cleaver, chop the piece with the bone in half, resulting in three similar-sized pieces. Then, cut the drumstick in half through the bone. When you’re done with all four thigh quarters, you should have 20 pieces of chicken when done. Alternatively, debone the thigh pieces with skin intact, and cut into two-inch pieces. Place the chicken in a shallow pan and set aside.

For the marinade, combine garlic, ginger, soy sauce, mirin, sesame oil, and a few grinds of black pepper in a bowl and mix. Pour marinade over chicken and coat well using your hands. There should be just enough marinade to coat the chicken. Cover and refrigerate at least 20 minutes or up to two hours.

Line a shallow tray with paper towels and set aside. Heat six cups duck fat (or vegetable oil) in a heavy-bottomed pot over medium-high heat until the oil reaches 325 degrees Fahrenheit. Place 1 cup potato starch in a large bowl and gently toss each piece of chicken until lightly coated. Carefully lower half the chicken pieces into the hot oil. Cook the chicken until it is nicely browned and begins to rise to the surface, 9 to 11 minutes. Once the chicken is cooked through, remove it from the oil using tongs and place onto paper towel-lined tray. Toss with a pinch of kosher salt while still hot. Repeat with second batch.

Serve immediately with lemon wedges and Japanese mayonnaise.IMG_4553

When finished deep-frying the chicken, season with salt, then sprinkle with this soy-chili oil vinaigrette:

1/2 cup Japanese soy sauce

1/4 cup rice vinegar

2 teaspoons hot chili oil

2 teaspoons sugar

Combine all ingredients and stir until sugar is dissolved.

Chef Takashi’s Stir-Fry Udon Noodles

3 tablespoons vegetable oil

1/2 pound large shrimp, shelled and deveined

1/4 pound skinless, boneless chicken breast, thinly sliced

2 1/2 cups chopped Napa cabbage

1 small onion, thinly sliced

1 carrot, thinly sliced on the bias

7 ounces enoki mushrooms

4 ounces oyster mushrooms

1/4 cup dried wood ear mushrooms, soaked in warm water for 10 minutes and drained

1/2 cup chicken stock

3 tablespoons soy sauce

1 teaspoon Asian sesame oil

18 ounces frozen precooked udon noodles, thawed

Kosher salt and freshly ground pepper

Chopped scallions, for garnish

In a skillet, heat 1 tablespoon of the vegetable oil. Add the shrimp and stir-fry over moderately high heat until curled, 2 minutes; transfer to a plate. Add 1 tablespoon of vegetable oil to the skillet. Add the chicken and stir-fry until white throughout, 3 minutes; transfer to the plate with the shrimp.

Add the remaining 1 tablespoon of oil to the skillet. Add the cabbage, onion, carrot and the mushrooms and stir-fry for 4 minutes. Add the stock, soy sauce, sesame oil, shrimp and chicken; remove from the heat.

Meanwhile, cook the udon in a pot of boiling salted water for 1 minute. Drain and add to the skillet. Stir-fry over high heat until heated through. Season with salt and pepper, garnish with scallions and serve.


Bourbon and Southern Cooking at the Historic Beaumont Inn

Robert E. Lee CakeWhen I arrive in the new bourbon tasting room at the historic Beaumont Inn, there are already set-ups of four bottles of bourbon with empty glasses in front of each. Master Blender Dixon Dedman, who with his parents own the inn which has been in their family since 1917, is famed for his bourbon tastings as well as his revival of the bourbon his great great grandfather, Charles Dedman, who in 1880 started up what would become one of the largest distilleries in the state, until before Prohibition shut it down.

In other words, Dedman is a bourbon expert and I am someone who in my college days mixed the spirit with diet cola. But not this evening. Dedman is going to teach me how to taste the “terroir” of bourbon meaning the type of land here—limestone rock and natural springs that give a special flavor to the wheat, corn and rye used to make bourbon. There is, I note, no diet cola anywhere in sight.

“When they char the barrel it releases the sugars and caramelizes it,” Dedman says as he pours Pappy Van Winkle, a 20-year old bourbon named in tribute to Julius Van Winkle by his grandson and great grandson who are carrying on the family tradition.

That’s important because Pappy Van Winkle is a wheated bourbon which means it contains no rye  and thus gets its flavor from the interaction with the barrel.

“Focus on where you’re tasting it,” he says. “That’s how you build your palate.”

Because it’s wheated,  which means, Dedman tells me, you can taste it in the front of your mouth.

Pappy Van Winkle has almost a cult like following says Dedman.

“When they’re going to release it, people sit in their cars in front of liquor stores for two days to get a bottle,” he says.

At this point, I know I can’t ask for a can of diet cola.ky-owl-bourbon-e1505438614307.jpg

The next taste is a sip of Four Roses Al Young 50th Anniversary. Now I remember Four Roses as a cheap bourbon—the kind you do mix with soda pop particularly at college dorm parties but its roots go back 130 years. The brand was allowed to languish and almost disappeared until Al Young, Senior Brand manager with 50 years of experience in the bourbon biz, was allowed to bring it back to its glory. He has several blends which are based on patented yeast strains he’s developed. The taste of this bourbon comes from the yeast strains and rye and Dixon says to pay attention to its finish on the back on the mouth.Cornmeal cakes witht beaten biscuits

When Dixon was working on developing Kentucky Owl he wanted to emulate the complexity of Four Roses. Later this month, he’ll be releasing his Kentucky Owl Batch # 7, the seventh of his limited release bourbons.

“It’s an 11-year old Kentucky Straight Rye Whiskey and it’s exactly what a Rye Whiskey should be,” Dixon writes on Kentucky Owl’s Facebook page. “I put this blend together and bottled it at 110.6 proof. It’s a full-flavored rye perfect for the coming fall weather.”

Barrel aging can produce bourbons with a high proof count but then before they’re bottled, they’re watered down to around 80 proof. But Dixon wasn’t about to do that to Kentucky Owl.

“It’s full flavored,” he said about this batch of Kentucky Owl and it sure was. “You can’t hide anything in barrel proofed whiskeys.”

Later, when I’m in the dining room ordering dinner—the Classic Beaumont Inn fried yellow leg chicken, beaten biscuits, country ham—I glance at the bourbon list. I read that Dixon’s Batch #6 costs $40 a glass and am glad I didn’t ask for a diet cola. Not just because I would have looked stupid but also because I had begun to get a sense of how to appreciate a great bourbon.

Beaumont Classic DinnerBut the Beaumont Inn is about more than Kentucky Owl. It was built in 1845 as a girl’s school and was bought by Dixon’s great great grandmother in 1917. Two years later she turned it into an inn. Many of the recipes on the menu and in their cookbook have been favorites since they first opened including, fried green tomatoes, house made pimento cheese, traditional Kentucky Hot Brown, corn meal batter cakes with brown sugar syrup and the General E. Lee Orange Lemon Cake.

The latter, my waiter told me, was such a favorite of the general that he carried the recipe in his breast pocket. I guess that was in case anyone asked if they could bake a cake for him. I, of course, had to order that despite being a northern girl, and it was delicious—very light with a distinct sugary citrus taste. The lightness I discovered later was because the cake flour used in the recipe is sifted eight times.

The food at the Beaumont Inn is so good that a few years ago they won the James Beard America’s Classic Award which is given to “restaurants with timeless appeal, each beloved in its region for quality food that reflects the character of its community. Establishments must have been in existence for at least ten years and be locally owned.”

The inn itself is beautiful, all polished wood and thick carpets, antique furniture and the timeless grace of a wonderfully kept three-story historic mansion with an exterior of red brick and tall white columns. Located in Harrodsburg, the oldest city in Kentucky, it sits on a rise on several rolling, beautifully landscaped acres. I mentioned Duncan Hines a few weeks ago when I was writing about Claudia Sanders Dinner House in Shelbyville, Kentucky well, Duncan was here quite a bit too and I can see why.

“Now write this down for the people in Kentucky,” he told a reporter back in 1949. “[Say] I’ll be happy to get home and eat two-year-old ham, cornbread, beaten biscuits, pound cake, yellow-leg fried chicken, and corn pudding. And you can say what I think is the best eating place in Kentucky: Beaumont Inn at Harrodsburg.”

DSC_0446
Beaumont Inn

The food here is real Kentucky fare–Weisenberger meal from a seventh generation mill not far from here, Meacham hams which the Dedmans bring to maturation in their own aging house—a process that takes several years and, of course, Great Great Grandpappy’s Kentucky Owl.

The following recipes are courtesy of the Beaumont Inn Special Recipes, their cookbook now in its sixth edition.

Corn Pudding 

2 cups white whole kernel corn, or fresh corn cut off the cob
4 eggs
8 level tablespoons flour
1 quart milk
4 rounded teaspoons sugar
4 tablespoons butter, melted
1 teaspoon salt

Stir into the corn, the flour, salt, sugar, and butter. Beat the eggs well; put them into the milk, then stir into the corn and put into a pan or Pyrex dish. Bake in oven at 450 degrees for about 40-45 minutes.

Stir vigorously with long prong fork three times, approximately 10 minutes apart while baking, disturbing the top as little as possible.

Country Ham Salad

6 cups chopped aged country ham

1 cup chopped celery

1/2 cup chopped red pepper

1/2 cup chopped purple onion

1.5 cups chopped sweet pickle

2 chopped hard boiled eggs

2 tablespoons of whole grain mustard

Hellman’s Mayonnaise to your liking.

Note: This is great on crackers, finger sandwiches with a thin slice of homegrown tomato, toasted open faced sandwiches with tomato and a melted slice of your favorite cheese or as an appetizer – toasted crostini, ham spread, thin slice of homegrown tomato topped with shredded parmesan cheese run under the broiler.

Corn Meal Batter Cakes

1 cup corn meal

1/2 teaspoon baking soda

1 1/4 cups buttermilk

1/2 teaspoon salt

2 eggs, beaten

2 tablespoons bacon drippings or shortening

Sift meal, soda and salt together. Add beaten eggs, then buttermilk. Beat until smooth. Dip a tablespoon of batter (or a bit more) onto a greased hot griddle. Let brown on bottom, then turn quickly and lightly to brown on other side. Serve with Brown Sugar syrup.

Makes about 10-12 good-sized cakes.

Brown Sugar Syrup

2 pounds light brown sugar

3 cups cold water

Mix sugar and water well. Bring to a hard boil for 10 minutes. Do not stir after placing over heating element as stirring or agitating will cause syrup to go to sugar

General Robert E. Lee Orange-Lemon Cake

9 Eggs, separated

a few grains salt

2 cups cake flour, sifted twice before measuring

2 cups white sugar, sift 6 times

1 1/2 teaspoons baking powder

1/2 teaspoon cream of tartar

1 lemon, juice

Grated rind (yellow part only)

1/2 cup vegetable oil

Beat egg yolks to creamy texture; beat egg whites until stiff. Add baking powder and tartar to flour and sift six times. Mix all ingredients together. Divide batter into four greased 9-inch cake pans. Bake at 325 degrees for 20 minutes. Turn cakes upside down on a rack until cool.

Spread Orange-Lemon Frosting between layers and on top and sides of cake. Store in refrigerator until serving time. Garnish with orange slices and fresh mint leaves if desired.

Orange-Lemon Frosting

¼ pound butter, softened

3 egg yolks

2 (16 ounce) packages powdered sugar, sifted

4 oranges, rind of, grated

2 lemons, rind of, grated

4 tablespoons lemon juice

6-8 tablespoons orange juice

Cream butter; add egg yolks and beat well. Add powdered sugar and grated rind alternately with juices, beating well.

Original “Robert E. Lee” Cake

Twelve eggs, their full weight in sugar, a half-weight in flour. Bake it in pans the thickness of jelly cakes. Take two pounds of nice “A” sugar, squeeze into it the juice of five oranges and three lemons together with the pulp; stir it in the sugar until perfectly smooth; then spread it on the cakes, as you would do jelly, putting one above another till the whole of the sugar is used up. spread a layer of it on top and on sides.

638 Beaumont Inn Drive, Harrodsburg, KY. (859) 734-3381; beaumontinn.com

Cooking with the Faeries

lavender-shortbread-cookies_lrg-0015-credit-sara-ghedina-e1518153286780.jpgTo me, fairies have always been about the holiday season—think the Sugar Plum Fairy from the Nutcracker Suite ballet and Tinkerbell, the blonde-haired imp who wore a green outfit with matching translucent green wings in the 1904 play Peter Pan and knew how to handle a wand and pixie dust—both a job requirement. Imagine then my delight when my friend Lily Lopate sent me a copy ofThe Faerie Handbook: An Enchanting Compendium of Literature Lore, Art, Recipes and Projects by Carol Turgeon with Grace Nuth and the Editors of Faerie Magazine (Harper Design 2017; $35). And yes, there is a Faerie Magazine.

This beautifully illustrated book containing all things faerie (the archaic literary spelling) is divided into chapter including Flora & Fauna with such headings as “A Select List of Fairy World Inhabitants” and their history, a “Fairy Herb and Flower Almanac,” as well as instructions on making such fairy necessities as houses, furniture, pressed flowers, and terrariums. In the section on Fashion & Beauty we learn about such style icons as Morgan Le Fay, Titania of the Fairy Realm and La Belle Dame Sans-Mercy—a woman with eyes that mesmerized helpless, handsome men (way to go, La Belle, we say).  The Fashion & Beauty chapter gives us the low down on fairy couture including fairy shoes which are totally inappropriate for walking particularly the ones with five-inch heels made of flowers. It also contains directions on how to make a fairy crown—a clothing item no one should be without.

It isn’t easy being a fairy. You have to get up early to gather the right beauty ingredients. After all, according to Samuel Pepys, the great 17th century diarist, his wife was a big believer in maintaining her looks in a faerie manner by collecting early morning May dew. Another requirement is being able to make fairy dust. That’s what Tinkerbell used to get Peter Pan to fly. You wouldn’t want to be without it.

Want to hang with the faeries? The authors tell about how to find fairy portals and pathways. You’ll need to read the chapter, but we can give some hints. Look for a strange circle of mushrooms (those are fairy rings), bridges (but be careful of the trolls, country crossroads are good places to run into fairies (but devils hang out there too) and natural portals like ocean cliffs and tangled branches with an open center in the middle.

Of course, what interested me the most was fairy food. As one might expect, fairies love parties and the authors show us how to host a Midsummer Night’s Dream Garden Party. Fairies main ingredient when it comes to cooking seems to be edible flowers. Their menus consist of such goodies as Flower Lollipops, Honey Ricotta Tart with Lavender Scented Crust, Candied Violets and Lavender Shortbread Cookies.

Faeries also love tea parties—ones with lots of flowers in pastel colors of pink, lavender, violet, pale blues and even moss. What to eat at such a party? Fairy Tea Cakes and flower teas.

Frosted cranberries (1)Candied Violets

40 fresh violets, pesticide free, with stems intact

1 egg white

1 cup superfine sugar

Special Equipment:

Fine-tipped paintbrush, preferably new

Small sharp scissors

Place a wire rack over a parchment-lined baking sheet and set aside.

In a small bowl, whisk the egg white until frothy.

Holding a violet by the stem, dip the paintbrush in the egg white and carefully coat each petal, front and back.

Sprinkle the superfine sugar over the violet and shake off any excess. Sprinkle again until the whole flower is lightly coated.

Gently place the violet on the drying rack. Repeat with theremaining flowers.

Allow the violets to dry for 24 hours, then use the scissors to cut off the stems. Candied violets may be stored in an airtight container for up to eight weeks.

Lavender Shortbread Cookies

¾ cup granulated sugar

1 teaspoon dried lavender, pesticide-free

1 stick plus 4 tablespoons unsalted butter, softened

¼ teaspoon fine sea salt

2¼ cups all-purpose flour

3 tablespoons whole milk (optional)

½ cup sanding sugar (optional)

Preheat the oven to 350° F.

Line a baking sheet with parchment paper.

Place the sugar and lavender in a food processor and pulse to achieve a fine texture.

In a large bowl, combine the lavender sugar, butter, and salt. Use the electric hand mixer to cream the ingredients until light and fluffy.

Gradually add the flour, mixing until the dough comes together. If it’s too crumbly, lightly wet your hands with water and knead the dough in the bowl untilthe flour is completely absorbed, and the dough is smooth.

Transfer the dough to a lightly floured surface. With a rolling pin, roll out the dough to a ½-inch thickness.

Use a cookie cutter to cut out the dough. Transfer the cookies to the parchment-lined baking sheet.

If desired, use the pastry brush to lightly coat each cookie with milk, then sprinkle with sanding sugar.

Transfer cookies to the oven and bakefor approximately 25 minutes, rotating the pan once, until the cookies are golden brown.

The cookies will be very soft when you remove them from the oven, but will set once cool. Allow them to cool completely on the baking sheet before transferring them to a plate.

Frosted Cranberries

1 ½ cups water

1 ½ cups granulated sugar, plus 1 cup for dusting

1 cinnamon stick

4 whole cloves

2 cups fresh cranberries

In a small saucepan, combine the water, sugar, cinnamon, and cloves. Cook over low heat, stirring until sugar is dissolved.

Remove from heat and cool for 15 minutes before stirring in the cranberries. Transfer to a bowl, cover, and refrigerate overnight.

The next day, set a wire rack over a parchment-lined baking sheet. Use a slotted spoon to transfer the berries onto the rack and set aside for 1 hour. Meanwhile, line another baking sheet with parchment paper.

Place the remaining 1 cup sugar in a shallow dish. Working in small batches, roll the cranberries in the sugar until they are completely coated, then transfer to the clean parchment-lined baking sheet. Make sure berries are in a single layer and not touching each other.

Allow to stand at room temperature for about 1 hour or until dry. Frosted cranberries may be stored in an airtight container for several days.

The above recipes are from the book: THE FAERIE HANDBOOK by Carolyn Turgeon and the editors of Faerie Magazine. Copyright © 2017 by Carolyn Turgeon. Reprinted courtesy of Harper Design, an imprint of HarperCollins Publishers.

lavender-shortbread-cookies_lrg-0015-credit-sara-ghedina.jpg

Valerie’s Home Cooking: More than 100 Delicious Recipes to Share with Friends and Family

spicy-arrbiata-penne-1-e1511419358806.jpg
Photographer Leslie Grow, Food Styling Cat Steele, Prop Styling Lindsey Lower, Spicy Arrabiate Penne

I had the chance to chat with Valerie Bertinelli when she was in Chicago a few weeks ago to sign copies of her new cookbook, Valerie’s Home Cooking: More than 100 Delicious Recipes to Share with Friends and Family (Oxmoor House 2017; $30). It’s always interesting to meet someone in real time that you’ve, in a way, grown up with. Not saying Bertinelli and I were from the same neighborhood or belonged to the same Girl Scout troop, but I was about her age when I watched her play the role of Barbara on “One Day at a Time,” which ran from 1975-1984. The sitcom was rather revolutionary for its time because it was about a divorced single mom raising two kids at a time where most family shows were about households with a mom, dad and a couple of kids.

“Barbara” was adorably cute, bubbly and, in my memory, almost always smiling. Flash forward 30 some years, numerous movies and a starring role on the TV series, “Hot in Cleveland” for which she won her second Golden Globe award (the first was for “One Day at a Time”) and Bertinelli could still be channeling Barbara. She’s warm and friendly and totally enthusiastic about cooking. Currently she has two Food Network shows, “Valerie’s Home Cooking” and “Kids Baking Championship,” the latter which she co-hosts with pastry chef Duff Goldman.Oxmoor House Valerie's Home Cooking Steamed Clams with Spicy Garlic Bread

Her cooking style, she says, is all about simplicity and ease.

“Who wants to complicate their life any more than they have to?” she says.  “We all have enough complications going on in our life, so let’s make it easy in the kitchen. The last thing I want is for people to feel intimidated by my recipes so I work at making them easy to follow and delicious as well.”

Each of the 100-plus recipes in her book not only tell how long they take to make from start to finish but also the “hands-on” time. For example, hands-on time for her Spicy Arrabiata Penne is five minutes, total cooking time is 20 minutes. She also prefaces the recipes with a personalized anecdote about its importance to her and offers variations of the dish.

Describing herself as a Food Network addict, Bertinelli says it’s “crazy” to find herself starring in two shows on the channel and writing a cookbook, the title of the first being a take on her original TV series and called “One Dish at a Time.”

When asked how cooking at home differs from preparing dishes on her show, Bertinelli says she finds it challenging because when she’s cooking in her own kitchen she’s cooking alone.

“I don’t have to look up and talk and explain how and why I’m doing something,” she says. “It’s a little bit different of a muscle. It’s like cooking two Thanksgiving dinners every day as we shoot each show. You’re on your feet a lot and I’m exhausted everyday shooting the show. But it’s also invigorating as well because it’s so much fun to share something I love.”

Steamed Clams with Spicy Garlic Bread

Serves 2

Hands-on 20 minutes

Total 20 minutes

2 tablespoons olive oil

8 ounces smoked sausage, sliced

1 shallot, thinly sliced

2 garlic cloves, chopped

1⁄8 teaspoon crushed red pepper

1 cup dry white wine

1/2 cup coconut milk

1 tablespoon salted butter

1⁄8 teaspoon ground turmeric

1⁄8 teaspoon ground ginger

1 teaspoon kosher salt

¼ teaspoon black pepper

1 pound clams in shells, scrubbed

1 tablespoon fresh lime juice

3 lemon thyme or thyme sprigs

Spicy Garlic Bread (recipe follows)

Heat the oil in a large skillet over medium. Add the sausage; cook, stirring often, until golden brown, about 5 minutes. Transfer the sausage to drain on paper towels, reserving the drippings in the skillet.

Place the sausage in a large serving bowl.

Add the shallot to the skillet; cook, stirring often, until translucent and tender, 3 to 4 minutes. Stir in the garlic and crushed red pepper; cook for 1 minute. Add the wine, stirring and scraping to loosen the browned bits from the bottom of the skillet. Stir in the coconut milk, butter, turmeric, ginger, salt, and black pepper. Add the clams; cover the skillet, and let the mixture steam until the clams open, 6 to 7 minutes.

Transfer the clams to the bowl with the sausage. Stir the lime juice into the broth. Pour the broth over the clams and sausage. Remove the leaves from the thyme sprigs; discard the stems. Sprinkle the clam mixture with the lemon thyme leaves. Serve immediately with the Spicy Garlic Bread.

Spicy Garlic Bread

Serves 4

Hands-on 5 minutes

Total 10 minutes

1 (12-ounce) French bread loaf

¼ cup unsalted butter, softened

3 garlic cloves, minced

¼ teaspoon crushed red pepper

Pinch of kosher salt

Preheat the oven to 350°F. Cut the bread in half lengthwise through the top of the loaf, cutting to, but not through, the opposite side. Cut the bread crosswise at 1-inch intervals, cutting to, but not through, the opposite side.

Stir together the butter, garlic, crushed red pepper, and salt. Spread the butter mixture over the bread and between the slices.

Bake until golden brown, 5 to 7 minutes.