So posh it needs only two words in its name, The Getty is really two places, the much better known Getty Center and the magnificent Getty Villa, a recreation of a Roman country house circa 1 A.D.
Photo courtesy of getty.edu
The latter is all-ancient Roman and Greek art—running the gamut of paintings, pottery, sculptures, glass and all that made this period so culturally rich but don’t look for anything newer than the fall of the Roman Empire amongst the 23 galleries and in the four glorious gardens brimming with plantings of pomegranates, oleanders, stone pines and damask roses, all known to have existed several millenniums ago.
Early
spring is sweet in Southwest Michigan when the sap rises ready to be harvested
and turned into sticky sugary and wonderful maple syrup.
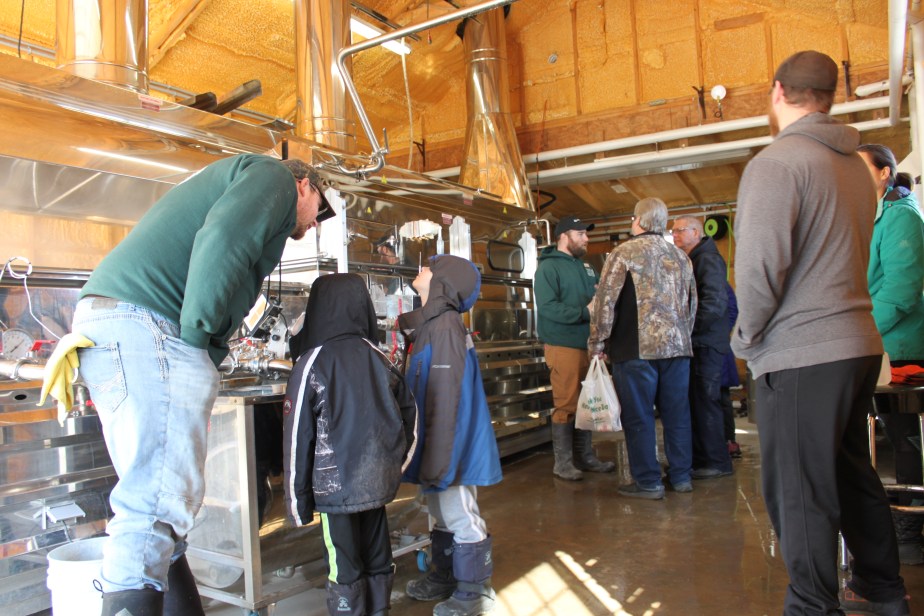
Surprisingly, there are many maple syrup producers in Southwest Michigan, some who market their syrup throughout the state and beyond and others who are known locally and sell just as long as their supplies last.
Denise Klopfenstein of Galien, Michigan comes from a long line of family members who make maple syrup and she’s long listened to stories about how her grandparents’ sugar shack was destroyed in a tornado back in the 1940s. But she never had plans on producing syrup herself. That is, until, worried that her son Tyler, who was 12 at the time, didn’t take enough interest in outdoor activities, she decided to turn to her family traditions into a way of motivating him.
“I
knew he liked business and he liked money,” says Klopfenstein who invested in
some rudimentary syrup processing equipment and designed a sugar shack–the
term for the building where the sap is cooked down into syrup, naming the
business Ty-Kat Sugar Shack.
Relying
upon mentors like Don Dodd of Niles who has been making syrup for years, the
Klopfensteins have increased their yield and upgraded their equipment several
times over the last few years.
“Tyler’s
always working at it–he spent his own money this year, money he’d made from
making maple syrup to buy an even larger evaporator,” says his mom.
“I’m hoping for a nine-week season this year,” says Rachel Ridley, who with her husband Brian, owns Ridley Family Sugar Farm in South Haven. “The sap is in the trees all the time but it’s only accessible to us at certain times. You need freezing nights and warm days for the sap to rise. Last year we only had six weeks of production because of the weather but this year seems more like 2014 we hope.”
Not
only do the Ridleys produce pure maple syrup, they also work with other local
farmers to create about 14 or so specialty syrups using fruits such as
dewberry, apple, pear, peach, blackberry, plum, cherry, black walnut and
blackberry.
“Everyone
likes maple syrup on their pancakes,” says Ridley, “but products like our apple
and pear syrup is good as a meat marinade.
Also going beyond just maple syrup, Christy and Bryan Olson, owners of Maple Row Sugarhouse in Jones, Michigan, create a variety of maple syrups infused with blueberry, raspberry, cinnamon and coffer among their other specialty syrups.
“We
also make other products such as our Maple Cajun Seasoning which has our maple
sugar in it as well as such spices as cayenne, paprika, garlic and onion which
you can use as a rub or in soup,” says Olson. “I make maple candies, maple hot
sauce, maple garlic seasoning, maple barbecue sauce and maple cream which has
the consistency of peanut butter and is good as an apple dip. And this year I’m
partnering with a chocolate maker and making both dark and milk maple cream
chocolates.”
Olson
says they have over 10,000 taps (the spikes that are used to drain sap from the
trees) and produce 3000 to 4000 gallons of syrup each year from about 100,000
gallons of sap.
“40
gallons of sap make about one gallon of syrup,” says Olson, noting that
Michigan State University is doing research on the trees they tap. “Towards the
end of the season it can take about 100 gallons of sap for one gallon of syrup.
The content of sugar in sap is about 1% to 3% and if it’s below the 1% mark,
that about when you’re done for the year.”
The
Olsons also host an annual maple syrup festival at their farm.
John Newell, owner of Primal Woods in Hartford, says he and his wife Geri, started tapping trees as a hobby in the spring of 2014 for their own use.
“We
got our first evaporator two years later and ran that one for two years and
then scaled up to 750 taps,” he says. “Now we’re making about 150 gallons, 16
half-pint bottles of every gallon and about 2400 bottles.”
Describing
what they’re doing as small to mid-size, Newell says that in Vermont, guys go
out and tap 70,000 trees.
“To
do that, they’re using industrial equipment, which gets the people out of the
whole process,” he says. “We’re not about that. We’re still using buckets,
we’re never going to tubes, it makes the woods look like an extensive care
unit.”
Newell
isn’t a fan of reverse osmosis either. That’s the process many maple syrup
gatherers use to filter out the water in the sap to limit the time it takes to
cook the sap down into syrup.
“Maple
sap is usually 2% sugar,” he says. “With reverse osmosis, it’s eight ounces. But
using it changes the color of the syrup and the flavor typically goes with the
color. There are four colors—golden, amber, dark and very dark and the darkest
has the most flavor. I guess overall, we’re still doing it the old fashioned
way. My analogy is we live in a deep maple sugar forest and the taste of the
syrup reflects the biodiversity of the forest.”
About
five years ago, John Muellen, who lives on 40 acres in Baroda, ten of which are
tillable and the other 30 woodland, was feeling kind of bored so he started off
tapping maple trees and cooking the sap down in roasting pans suspended over
cement blocks on a log burning fire. Getting into the process even more, he
made a boiler out of a fuel oil tank, lit a fire inside and set buffet pans the
flames.
“I was constantly improving,” says Muellen, owner of Mulln-Heim Vineyards. “Last year, I came across a reverse osmosis machine from a brewery and modified it to use for making syrup. It’s all part of wanting to make money from the forest in a way that’s not harmful to the environment. Because that’s the way it’s supposed to be.”
Maple sugaring time comes just about when the root cellar is
nearly empty. Oven roasting concentrates vegetable flavors and the syrup pulls
it all together. Roast a chicken and there’s dinner. The house-apartment-condo
will smell wonderful.
3 medium carrots, peeled and cut into 1 1/4-inch chunks
3 medium parsnips, peeled and cut into 1 1/4-inch chunks
1 small (1/2-pound) yellow turnip, peeled and cut into 1 1/4-inch
chunks
4 tablespoons butter
1/2 cup maple syrup
1/4 cup bourbon or rum
1 1/2 teaspoons kosher salt
Freshly ground black pepper
Preheat oven to 350 degrees. Arrange the carrots, parsnips and
turnips in a single layer in a shallow roasting pan.
Heat the butter and maple syrup in a small saucepan just until the
butter is melted, about 2 minutes. Remove from heat. Stir in the rum.
Pour the maple mixture over the vegetables and toss to coat.
Sprinkle the vegetables with salt and pepper to taste.
Cover the pan with aluminum foil and bake for 25 minutes. Remove
the pan from the oven, stir the vegetables and bake, uncovered, until tender,
20 to 25 minutes longer.
Maple Sour Cream Bran Muffins
This ab-fab recipe took first prize in the 1999 recipe contest
sponsored by the Wisconsin Maple Syrup Producers Association.
1 cup flour
1 teaspoon baking soda
Pinch salt
1 cup bran flakes
1/3 cup raisins
1/2 cup chopped walnuts
1 cup pure maple syrup
1 cup sour cream
2 large eggs
For the topping
3 tablespoons flour
2 tablespoons brown sugar
1 tablespoon butter
Preheat the oven to 400 degrees. Grease a 12-cup muffin tin and
set aside.
Sift the flour, baking soda and salt into a medium-size bowl. Add
the bran flakes, raisins and walnuts.
Combine the maple syrup, sour cream and eggs in a small bowl. Add
them all at once to the dry ingredients and stir until just blended. Using a
1/3- or 1/2-cup measure, fill the muffin cups three-quarters full with the
mixture.
For the topping
Combine the flour and sugar in a small bowl. Cut in the butter
until the mixture is crumbly. Sprinkle the topping on the batter in the cups.
Bake for 15 to 20 minutes, or until the muffins are golden brown.
Makes 12.
Here,
you brown the wings first over direct heat without any sauce. That’s when the
skin gets
crispy.
Then you move the wings over indirect heat, where it is safe to layer on the
sweet sauce
without
the threat of it scorching.
12
large chicken wings, about 3 pounds total
Extra
virgin olive oil
RUB
1
teaspoon kosher salt
1
teaspoon dried oregano
1/2
teaspoon ground cumin
1/2
teaspoon chipotle chile powder
1/4
teaspoon ground black pepper
SAUCE
3/4
cup ketchup
1/4
cup maple syrup
1/4
cup bourbon
2
tablespoons
cider vinegar
1/4
teaspoon chipotle chile powder
The
chicken wing is made up of three sections: the drumette (attached to the
chicken body), the wingette (or flat; the middle section), and the tip. Each
section has a bone ball socket, or joint. Flex each section to find the joint. Using the tip of a boning knife, and keeping
the joint extended to expose the socket, cut through the ball socket connecting
the drumette and wingette and then through the socket connecting the wingette
and tip. Discard the wing tips or save for stock (they tend to burn on the
grill).
Brush
the chicken wings very lightly with oil. In a small bowl mix together all the
rub ingredients, then season the wings evenly with the rub. Set aside at room
temperature while you prepare the grill. Prepare the grill for direct cooking
and indirect cooking
over medium heat (350° to 450°F).
In
a small saucepan, combine all the sauce ingredients. Bring to a boil over high
heat on the stove, then reduce the heat to a simmer and cook for 12 to 15
minutes, stirring occasionally. Remove from the heat and set aside.
Brush
the cooking grates clean. Grill the chicken wings and drumettes over direct
medium heat, with the lid closed as much as possible, for 10 minutes, turning
once or twice and watching closely for flare-ups that could scorch the skin.
Brush
the chicken pieces with sauce on all sides and move them over indirect medium
heat. Continue to cook, with the lid closed as much as possible, until the meat
is no longer pink at the bone, 10 to 15 minutes. During this time, stay
vigilant, as the sugars in the sauce could burn. Remove from the grill and
serve warm.
Saffron, Maple, and Vanilla Kefir Milk Fizz From Ferment by Holly Davis with permission by Chronicle Books
Fizzy milk is an acquired taste,
but once acquired you will likely want more. And this flavor combination
transforms milk into something quite special. I tend to drink kefir plain and
at room temperature throughout winter, but when summer comes, I serve it
chilled and fizzing.
Small pinch saffron threads
1 3⁄4 ounces boiling water
21 ounces ripe kefir
1 tablespoon maple syrup
1 vanilla bean, split lengthwise
Combine the saffron and boiling
water in a 4-cup jug and let it steep until cooled.
Once cooled, pour in the ripe
kefir. Add the maple syrup and stir well. Put the vanilla bean in a clean 3 cup
swing-top bottle, then pour in the kefir mixture (use a funnel to do this if
you have one).
Close the lid and leave the bottle
out at room temperature for 1 day, then open the bottle to release excess
pressure and place it in the fridge. Ready in approximately 1–3 days
It will keep in the fridge for up
to 5 days, but make sure to open (burp) the bottle once a day to prevent over‑carbonation.
Reprinted from Ferment by Holly Davis with permission by Chronicle Books
Known for her cookbooks which make
Indian cooking easily accessible for home cooks, Anupy Singla says that her
mother never taught her to cook.
“She didn’t want me to get stuck
in the kitchen like she did,” Singla tells me as we chat on the phone about her
cooking. So instead Singla, who was born
in India but grew up outside of Philadelphia having moved to the U.S. when she
was three, became a journalist working
as a business reporter for Bloomberg News in Chicago and a morning
reporter for Chicago’s CLTV. So far so good according to mom.
But the flavors, tastes and the lessons she learned from her grandfather when she returned to visit her large family in Punjab, led her to leave journalism and focus on cooking. Singla is still writing though and now has several cookbooks including the recently released updated edition of her best-selling The Indian Slow Cooker: 70 Healthy, Easy, Authentic Recipes(Agate 2018; Amazon price $13.36) as well as Indian For Everyone, which is a compilation of the most popular Indian recipes outside of India. Besides that, her blog with the wonderful name of “Indian As Apple Pie”—because, as she says, her approach to Indian food is from an American point of view–has grown to include a wide selection of spices and spice blends that she makes as well. She also offers Spice/Bollywood Tours of Chicago’s Little India.
In other words, her mother’s fears
were unfounded.
“It’s great to be in the kitchen,
when you own it,” says Singla.
Spiced
Cauliflower and Potatoes
Aloo Gobi
Slow Cooker
Size: 4- Or o- Quart
Cooking
Time: 3 Hours on Low
Yield: 7
Cups
“Until I made this myself in the slow cooker, I refused to believe my mother-in-law when she said it was possible,” Singla writes in the introduction to this recipe. “I also wondered why I wouldn’t just make this dish on the stovetop, where it could sit for less time. After trying it once, I realized the answer: because I can now stick it in my slow cooker and go about my day. I don’t think twice about the kids near the stove or anything burning. My father—the real foodie of the family—also wouldn’t believe this dish could be made well in the slow cooker, so he just had to try it himself. He had me on the phone in excitement for half an hour after trying it for the first time.”
1 large head cauliflower, cut into 1-inch pieces (about 8 cups)
1 large potato (russet or yellow), peeled and diced (about 2 cups)
1 medium yellow or red onion, coarsely chopped
1 medium tomato, diced or pureed (optional)
1 (2-inch) piece ginger, peeled and grated
3 cloves garlic, minced
3–4 fresh Thai, serrano, or cayenne chiles, stems removed, chopped or
sliced lengthwise
1 tablespoon cumin seeds
1 tablespoon red chile powder or cayenne pepper
1 tablespoon garam masala
1 tablespoon sea salt
1 teaspoon turmeric powder
3 tablespoons vegetable oil
1 heaping tablespoon fresh cilantro, chopped
Put all the ingredients except the cilantro in the slow
cooker. Mix well.
Cook on low for 3 hours. Mix once or twice during cooking,
especially in the beginning. Eventually the cauliflower will release enough
liquid to prevent anything from sticking to the sides of the slow cooker.
Add the cilantro. Mix well but gently so as not to break up
the cauliflower. Serve with roti or naan and a side of onion and cucumber
salad.
To make this dish in a 3 1/2-quart slow cooker, halve all
the ingredients and proceed with the recipe. Cook on low for 3 hours. A half
recipe makes 4 cups.
Creamy Turmeric Corn Soup
Slow Cooker
Size: 5-quart
Cooking
time: 4 hours on high
Yield: 18
cups
Singla notes at the beginning of
this recipe that turmeric is a spice she likes to add wherever she can do so without
the spice affecting the taste of her non-Indian dishes.
“Blending a tablespoon into this
corn soup is a great way to get all the healing properties without altering the
light, bright taste of corn,” she says. “Any more and it tastes too earthy. Use
nuts like cashews rather than dairy to make it creamy.”
2 ½ pounds frozen yellow corn, defrosted
1 medium potato (any kind), peeled and diced
1 large shallot, minced
½ cup raw, unsalted cashews
1 tablespoon turmeric powder
2 tablespoons sea salt
2 teaspoons coriander seeds
2 teaspoons ground black pepper
10 cups water
Put all the ingredients in the slow cooker.
Cook on high for 4 hours. Remove 1 cup of the corn.
(Carefully pick out any pieces of the potato and cashews that are removed and
put them back into the slow cooker.)
Blend until smooth with an immersion blender or carefully in
batches in a blender. Add back the corn you removed. Mix well and serve
immediately.
To make this dish in a 3 ½-quart slow cooker, us a 2-pound
bag of frozen corn, 2 teaspoons turmeric powder, and 7 cups water. Cut the
other ingredients in half and proceed with the recipe, cooking on high for 4
hours. A half recipe makes 11 cups.
The recipes above are reprinted with permission from The Indian Slow Cooker: 70 Healthy, Easy, Authentic
Recipes, 2ed by Anupy Singla, Agate Surrey, 2018.
Balancing the tangy flavors of yogurt, pomegranate and lemon, zesty spices and herbs such as cinnamon, mint and garlic, the sweetness of molasses and rose water along with grains and nuts is one of the defining factors of what makes Mediterranean cuisine so appealing says Maureen Abood, author of Rose Water & Orange Blossoms: Fresh & Classic Recipes from My Lebanese Kitchen (Running Press 2015; $30).
“And, of course, it’s healthy as well,” she adds.
Abood, who learned to cook from her Lebanese family, was the chief development officer for the St. Jude League in Chicago when a series of less-than-positive life events propelled her to leave her job and move to San Francisco to attend culinary school.
Raised in Lansing, where there is a large Lebanese population, she had spent summers at the family vacation house in Harbor Springs. That’s where she retreated after
graduating. Her goal was to write a blog about the foods of her childhood.
“There aren’t many people around during the off-season,” says Abood, “and that was good for my creativity.”
The cookbook, her first, is the outcome of her award winning blog, maureenabood.com and her desire to educate people about Mediterranean/Middle Eastern food.
“I want people to learn how to make this adventuresome but easily accessible food,” she says.
For those just starting on this culinary journey, Abood suggests starting with Chicken Hushweh (pronounced HUSH-wee), a dish she describes as always a favorite with family and friends.
“You can make a nice Romaine salad with a lemon vinaigrette, maybe topped with some freshly chopped mint to serve with it,” says Abood noting that her recipe for hummus and pita chips would also be a good accompaniment.
Her Pomegranate Rose sorbet offers a light, sweet-tart and refreshing dessert.
“I like to top it with chopped pistachios, the green and pink look pretty,” she says. “With the Chicken Hushweh, you have a great but easy meal.”
Hushweh (Chicken Rice Pilaf with Butter Toasted Almonds)
Makes 12 servings
For the chicken:
1 (3- to 4-pound free-range chicken (or if time is of the essence buy a roasted chicken from the grocery store)
1 large yellow onion, quartered
2 tablespoons extra-virgin olive oil
1/2 teaspoon paprika
1/2 teaspoon granulated garlic powder
1/2 teaspoon kosher salt
Few grinds of black pepper
For the rice:
2 tablespoons salted butter
1 pound ground beef chuck or lamb
1/2 teaspoon ground cinnamon
1 teaspoon kosher salt
Few grinds of black pepper
1 cup parboiled long-grain white rice (such as Uncle Ben’s)
2 cups chicken broth
1 cinnamon stick
3/4 cup Butter Toasted Almonds (see recipe below), divided
Heat the oven to 425°F
Pat the chicken dry. Place it in a large roasting pan. Stuff the cavity with the onion. Rub a couple of tablespoons of oil evenly over the skin and season the chicken all over lightly with paprika, garlic powder, salt, and pepper.
Roast the chicken until the juices run clear when the chicken is pierced and the meat reaches an internal temperature of 160°F in the thigh on an instant-read thermometer, about 1 hour. Baste the chicken every 15 minutes with its juices while it roasts.
Melt 1 tablespoon of the butter in a 4-quart Dutch oven or saucepan over medium heat. Add the ground beef and season it with the ground cinnamon, salt, and pepper. Cook the meat, stirring constantly and using a metal spoon to crumble it into small pieces until no trace of pink remains, about 5 minutes.
Stir the rice into the meat until it is completely coated with juices. Pour in the broth and bring it to a boil. Reduce the heat to low, tuck in the cinnamon stick, cover, and simmer for 20 minutes, or until all of the broth is absorbed.
Transfer the roasted chicken to a cutting board and when it is cool enough to handle, remove and discard the skin. Shred the chicken into 1-inch pieces.
Remove the cinnamon stick and add the chicken, 1/2 cup of the toasted nuts, and the remaining 3 tablespoons butter to the hot rice mixture, stirring to combine. Taste and add more salt, if needed. Sprinkle with the remaining nuts and serve immediately.
Butter Toasted Pine Nuts and Almonds
½ teaspoon salted butter
1 cup slivered olives or whole pine nuts
Fine sea salt, to taste
Melt the butter in a large skillet over medium heat. Add the nuts and reduce the heat to medium-low. Stir the nuts to coat them with the butter and continue stirring constantly until the nuts are golden brown. Keep a close watch over the nuts; they can burn quickly once they begin to brown.
Transfer the nuts to a bowl while they are still warm and salt them lightly. When they have cooled to room temperature, store the nuts in an airtight container in the refrigerator for a month or in the freezer for up to one year.
Pomegranate Rose Sorbet
Makes 8 servings
3⁄4 cup granulated sugar
3⁄4 cup warm water
1⁄4 cup light corn syrup
11⁄2 cups 100 percent pure pomegranate juice
Juice of 1 lemon
3 drops rose water
In a 2-quart saucepan over medium heat, heat the sugar with the warm water until the water boils and the sugar melts. Add the corn syrup, pomegranate juice, lemon juice, and rose water and simmer for 3 minutes.
Pour the mixture into a heatproof bowl, cool for 10 minutes, and then cover and chill it until it is completely cold. Or, pour the slightly cooled mixture into a heavy-duty plastic freezer bag and immerse it in a bowl of ice water until it is completely cold.
Churn the pomegranate mixture in an ice cream maker according to the manufacturer’s instructions. Chill the sorbet in the freezer in an airtight container for at least 12 hours and up to several weeks.
Heat the oven to 375°F. Butter and lightly flour a 9-inch round cake pan, and line the bottom with parchment paper.
In a small mixing bowl, prepare the topping by whisking the flour, sugar, cinnamon and salt, then cutting the butter in with a pastry blender, fork or your fingertips, working the mixture until it is coarse crumbs.
In a medium bowl, whisk the flour, baking powder, and salt. In a large bowl or in the stand mixer, beat the butter and sugar until they light and fluffy. Add the egg, vanilla, and rose water and mix until they are incorporated and the batter is smooth. Beat in 1/3 of the dry ingredient mixture just until they are combined. Mix in half of the milk, then alternate mixing in another 1/3 of the dry ingredients, the remaining milk, and the final 1/3 of the dry ingredients to make a stiff batter.
Spread the batter in the prepared pan. Scatter the raspberries over the top of the batter and gently press them in, just by about 1/2-inch. Sprinkle the topping evenly over the raspberries.
Bake the cake for 40 minutes, or until a toothpick inserted in the middle of the cake comes out clean. Cool the cake in the pan for at least 20 minutes, then turn the cake out onto a plate. Turn the cake over onto another plate to have the top facing up.
This recipe is adapted from SmittenKitchen.com, where it is a blueberry coffee cake.
FOR THE CRUMB TOPPING
5 tablespoons unbleached, all-purpose flour
1/2 cup granulated sugar
1 teaspoon cinnamon
4 tablespoons unsalted butter, cold
1 1/2 teaspoons kosher salt
FOR THE CAKE
2 cups minus 1 tablespoon unbleached, all-purpose flour
2 teaspoons baking powder
1/2 teaspoon kosher salt
4 tablespoons unsalted butter, softened
3/4 cup granulated sugar
1 large egg
1 teaspoon vanilla extract
1 teaspoon rose water
3 cups fresh raspberries
1/2 cup milk, whole or 2 percent
Heat the oven to 375°F. Butter and lightly flour a 9-inch round cake pan, and line the bottom with parchment paper.
In a small mixing bowl, prepare the topping by whisking the flour, sugar, cinnamon and salt, then cutting the butter in with a pastry blender, fork or your fingertips, working the mixture until it is coarse crumbs.
In a medium bowl, whisk the flour, baking powder, and salt. In a large bowl or in the stand mixer, beat the butter and sugar until they light and fluffy. Add the egg, vanilla, and rose water and mix until they are incorporated and the batter is smooth. Beat in 1/3 of the dry ingredient mixture just until they are combined. Mix in half of the milk, then alternate mixing in another 1/3 of the dry ingredients, the remaining milk, and the final 1/3 of the dry ingredients to make a stiff batter.
Spread the batter in the prepared pan. Scatter the raspberries over the top of the batter and gently press them in, just by about 1/2-inch. Sprinkle the topping evenly over the raspberries.
Bake the cake for 40 minutes, or until a toothpick inserted in the middle of the cake comes out clean. Cool the cake in the pan for at least 20 minutes, then turn the cake out onto a plate. Turn the cake over onto another plate to have the top facing up.
I love the premise of Danielle Walker’s latest cookbook, Eat What You Love: Everyday Comfort You Crave, with its idea that even if you’re gluten-intolerant (which so many people seem to be), have a dairy allergy, suffer from an autoimmune disease, are following a Paleo diet or just want to incorporate healthy eating a few days a week, you can easily do so.
Shrimp Fried Rice
Walker, who also authored the New York Times best-selling Danielle Walker’s Against All Grain: Meals Made Simple, likes to take classics that we love—think lasagna, apple crisp, fried chicken (yes, fried chicken), sloppy Joes and chicken pot pie and made them healthy and full of flavor.
“I’m always looking for ways to incorporate more vegetables into my family’s meals, and using riced cauliflower in this fried rice recipe inspired by Chinese takeout is a great way to do it,” she writes in her description of one of her super easy recipes (though I cheated and used soy sauce instead of coconut aminos and also bought rice cauliflower instead of doing my own). “The salty sauce can make any vegetable taste appealing, and this dish is pretty much all veggies. While it’s super-simple to make cauliflower rice at home, many supermarkets sell fresh or frozen riced cauliflower, so that’s what I use more often than not. Go ahead and use it straight from the freezer; there’s no need to thaw it first.”
Chocolate Zucchini Muffins
I’ve cooked several recipes out of this cookbook which I just received and all of them have turned out great—helping me keep my New Year’s resolution of eating healthier.
Shrimp Fried Rice
Serves 4 to 6 ·
11⁄2 pounds jumbo raw shrimp, peeled and deveined, with tails removed
6 tablespoons coconut aminos (see note below)
2 tablespoons toasted sesame oil
1 head cauliflower, cut into florets
5 tablespoons avocado oil
1⁄2 small yellow onion, minced
3 cloves garlic, minced
2 teaspoons peeled and minced fresh ginger
1 carrot, diced
2 eggs, beaten
11⁄4 teaspoons fine sea salt
1⁄4 cup frozen peas
2 green onions, tender green tops only, chopped
Combine the shrimp, 1 tablespoon of the coconut aminos, and 1 tablespoon of the sesame oil in a bowl.
Place the cauliflower in a food processor fitted with the grating attachment, or use the large holes on a box grater, and process the florets into rice-size pieces. Pick out any large fragments that didn’t shred and chop them up by hand with a knife or save for another use. You should have around 3 cups riced cauliflower.
Heat 2 tablespoons of the avocado oil in a wok over medium- high heat. Add the onion, garlic, and ginger and cook, stirring continuously with a wooden spoon, for 2 minutes, until fragrant. Add the carrot and cook, stirring continuously, for 2 minutes. Add the remaining 3 tablespoons avocado oil and the cauliflower and cook, stirring occasionally, for 4 minutes more. Transfer the cauliflower mixture to a plate and return the wok to the heat.
Add the shrimp mixture to the wok and sear for 1 minute per side, until pink all over and just cooked through. Transfer the shrimp to the plate with the cauliflower and return the wok to the heat.
Pour the eggs into the wok and stir to scramble them for 10 seconds, until mostly cooked through. Pour the cauliflower mixture and shrimp back into the wok and add the remaining 5 tablespoons coconut aminos, the remaining 1 tablespoon sesame oil, and the salt. Stir in the peas and cook for 1 minute longer. Top with the green onions and serve immediately.
Note: Coconut aminos, which are available at some local grocery stores or can be ordered online, are a Paleo substitute for soy sauce and still deliver the same salty tang, only they contain no soy and no wheat. If you’d rather just stick with soy, use the same amount as the coconut aminos.
Chocolate-Zucchini Muffins
Makes 24 · These muffins are moist and fluffy plus they’re nut free writes Walker, who keeps them in the freezer for a quick breakfast when the family’s frazzled and trying to get out the door for school. If zucchini isn’t in season, you could use shredded carrots.
11⁄2 cups shredded zucchini
8 eggs
1 cup unsweetened applesauce
1 cup pure maple syrup
2⁄3 cup coconut flour
1⁄2 cup unflavored collagen peptides powder or protein powder of your choice (optional)
1⁄2 cup raw cacao powder
6 tablespoons arrowroot powder
1 tablespoon baking soda
1 teaspoon ground cinnamon
1⁄4 teaspoon ground nutmeg
1⁄2 teaspoon fine sea salt
1⁄2 cup dairy-free chocolate chips (optional)
Preheat the oven to 350°F and line two 12-cup muffin tins with baking cups, or grease the tins with coconut oil. Line a plate with paper towels.
Place the zucchini on the prepared plate and allow it to drain some of its moisture while you make the batter.
Place the eggs, applesauce, and maple syrup in a stand mixer fitted with the beater attachment or use an electric handheld mixer. Mix on medium speed until combined. Add the coconut flour, collagen peptides powder, cacao powder, arrowroot, baking soda, cinnamon, nutmeg, and salt and mix on medium speed until combined.
Wrap the paper towels around the zucchini and give it a light squeeze to remove any remaining moisture. Add the zucchini to the batter along with 1⁄4 cup of the chocolate chips and mix on low speed until incorporated. Divide the batter evenly among the muffin cups, filling each two-thirds full. Sprinkle the remaining chocolate chips over the top.
Bake for 22 to 25 minutes, until a toothpick inserted into the center of a muffin comes out clean. Remove the muffins from the pan and allow them to cool completely on a wire rack before serving or storing.
Freeze in a single layer on a rimmed baking sheet, tightly covered with plastic wrap, for 4 hours. Place the frozen muffins in an airtight container and freeze for 4 months. To eat the muffins directly from the freezer, heat them in a 350°F oven for 10 minutes, until warmed through. Or, defrost in an airtight container in the fridge overnight, or for up to 1 week. If you prefer, warm on a baking sheet in a 400°F oven for 2 to 3 minutes.
It’s not pleasant to imagine what the world might have been
like if Winston Churchill hadn’t been able to persuade his chef, Georgina
Landemare to leave the kitchen where she was making a pudding and head down to
the basement bomb shelter with him. The date was October 14, 1940 and the
Germans were doing one of their nightly blitzes over London. This time a lucky
strike by Luftwaffe bomb destroyed the kitchen—and most of the building–where
they had been standing just moments before. Fortunately, both Churchill and
Landemare survived.
Always a fan of Churchill and always interested in the history of food, I am delighted to have a copy of Churchill’s Cookbook, a release of Landemare’s 1958 cookbook originally published as “Recipes from No. 10.” Churchill, famed not only for leading Britain to victory during World War II but also for his love of a good cigar, fine spirits and great food, once said “It is well to remember that the stomach governs the world.”
Besides Landemare’s recipes–short, easy to make, mostly
French but with little in the way of detailed instructions—her book also has
vintage photographs from the 15 years she cooked for the Churchills. An
introduction by Phi Reed, director of the Churchill War Rooms which I visited
on my one and only and very short trip to London, also gives historical
perspective. The War Rooms are an underground warren of rooms that tunnel under
the city of London where Churchill and his cabinet would meet and some of the
work of the war would be done. “This is the room from which I will direct the
war” Churchill announced after being elected Prime Minister in 1940 and
visiting his underground office.
Photos courtesy of the Daily Mail.
The rooms are now a museum and houses some of the recipes
from this book. Landemare, who started life in the “service” at age 14 as a
scullery maid, was the widow of Paul Landemare, a distinguished French chef at
the famed Ritz Hotel and most likely learned to cook from him. She made
Churchill breakfast in the morning and stayed in his service until he finished
his last whiskey of the night (and one can assume there were plenty of whiskeys
in between). She was such a necessity that, as Reed writes in his introduction,
“Georgina Landemare’s importance to Churchill was nicely and neatly illustrated
on VE Day, when after giving his rousing speech to the massed crowds in
Whitehall, he made a point of turning to his faithful chef and thanking her
‘most cordially’, saying he could not have managed all the way through the war
without her.”
As an aside, here is a fun anecdote showcasing Churchill’s
sense of humor and his love of food.
Invited to a buffet luncheon while visiting the United
States, Winston Churchill asked for a second helping of fried chicken by saying
“May I have some breast” to which the hostess reportedly replied “Mr.
Churchill, in this country we ask for white meat or dark meat.” The Prime
Minister abjectly apologized and sent the hostess a beautiful orchid the next
morning along with a note reading “I would be most obliged if you would pin
this on your white meat.”
Winston Churchill’s Favorite Fruit Cake
10 ounces plain flour
8 ounces butter
6 ounces sugar
5 eggs
10 ounces mixed dried fruit
4 ounces glacé cherries (cut in half)
1/2 teaspoon baking powder
Pinch of salt
Cream the butter and sugar together. Beat in the eggs one at
a time, adding a little flour to prevent the mixture curdling.
Sift the remainder of the flour with the baking powder and
salt and add this to the creamed mixture. Add the dried fruit and beat the
mixture well.
Spoon into a greased and lined round cake tin.
Bake for 2 hours in a moderate oven.
Boodles Orange Fool
6 sponge cakes
4 oranges
2 lemons
¾ pint cream
Sugar to taste
Cut up sponge cake lengthwise in slices and place in glass
dish.
Put in a basin the grated rind of a lemon and 2 oranges and
the juice of all the fruit. Mix well with the cream and sugar to taste.
Pour all over the sponge cakes and allow to stand for six
hours before serving.
The above recipes are from “Churchill’s Cookbook.”
We take the concept of heirloom or heritage fruits and vegetables as common place nowadays. But I was reminded how unfamiliar the concept was just several decades ago and how Herb Teichman, the owner of Tree-Mendus Fruit Farm in Eau Claire, Michigan who passed away earlier this month at the age of 88, was in the vanguard of re-introducing the fruits long ago to the American palate creating a connection to food heritage.
I
met Herb about 20 year ago and over the years wrote about his family and farm many
times. After reading about his passing, I thought I would re-read them. Here’s
the first few paragraphs of one of the first articles about Herb I wrote.
“For most of
us, Louis XIII is a hazy figure, a bewigged monarch who lived some 350 years
ago and had a furniture style named after him.
But for Herb
Teichman, owner of, Louis is but an apple away.
Apples are historical embodiments for Teichman who can tell you the history of each
heritage apple variety he grows. Take
the Calville Blanc D’hiver, a favorite of Louis XIII.
“This
was the classic dessert apple of France,” says Teichman. “Le
Lectier, who was the procurer for Louis XIII, grew it in the King’s gardens at Orleans. When I taste a
Calville Blanc, I began to feel like I know Louis the 13th a little
better. Eating these apples becomes a
bridge connecting the centuries.”
“Or take the Newtown Pippin, a favorite of both Ben Franklin and George Washington.
“When I bite into a Newtown Pippin, it’s like
I’m sharing something with Washington or Franklin,” says the (then) 72 year old
Teichman.
“Teichman,
a successful second generation fruit farmer (his parents first started farming
here in the 1920s), designates three of his 500 acres of fruit trees to raising
heritage apples. Heritage (or antique or
heirloom) is a term applying to varieties that have existed for 75 years or
more.
“According to Teichman, an apple tree
lives about 20 years so for these heritage varieties to still exist after all
these years means that generations of men and women believed that the fruit was
so good it was worth reproducing by grafting over and over again through the
centuries.
Teichman is
one of the few heritage fruit growers in the United States. And, as if that isn’t enough to discourage
people, Teichman says that there are few antique apple growers in the United
States because antique apples aren’t as commercially viable as the modern
apples. Heritage apples, which are more expensive than modern varieties–
aren’t always pretty—they tend to be much smaller than the varieties found in
stores, are often knobby and discolored.
But what they lack in looks, they make up for in flavor.
“Years
ago, if an apple like Margil or Pitmaston Pineapple, which tastes like a
pineapple, was growing in your yard, you possessed the best darn thing there is
in the world,” says Teichman who speaks in superlatives when talking of
apples. “They didn’t have candy bars; a
good apple was dessert.”
Talking
to Teichman is like getting a lesson in food history. “Each apple variety has a history of where
it originated, who liked to eat it and why,” he says. “And each apple really tastes different.
“Teichman says
he moves a little closer in time to his hero Thomas Jefferson when he bites
into an Esopus Spitzenberg apple.
Jefferson so loved this variety of apple that after returning from serving
an ambassadorship in France, he planted 12 Esopus Spitzenberg trees at
Monticello.”
Soon Martha Stewart discovered Teichman and featured a story about the heritage fruit at Tree-mendus. Makers of brandies and cordials wanted his heirlooms fruits to create old world flavors. Now the farm has more than 200 varieties of heritage apples.
And, of
course, heirloom fruits and vegetables are much more common. According to the
National Restaurant Association’s heirloom vegetables and fruit will continue
to be one of the top food trends in the area of produce as it has been in the
last few years. For that, we owe a big thank you to Herb.
In small saucepan,
combine the ¼ cup sugar and cornstarch. Stir in applesauce and brandy. Cook and
stir over medium heat until mixture is thickened and bubbly. Remove from heat.
Make crepes (recipe
below).
On each
mini-crepe, spoon one scant tablespoon of the filling along one edge of the
unbrowned side. Roll up tightly. Place seam side down in greased shallow baking
pan.
Mini-Crepes
3 egg yolks
½ cup milk
3 tablespoons
margarine, melted
¼ teaspoon vanilla
½ cup flour
¼ cup sugar
3 3gg whites
In bowl, beat
together egg yolks, milk, margarine, flour and sugar. Beat egg whites at high
speed until stiff peaks form, gently fold batter mixture into beaten eggs
white.
Heat lightly
greased 6-inch skillet. Remove from heat, spoon in one scant tablespoon of
batter, spread batter with back of spoon into 4-inch circle. Cook over medium
heat for 30 to 60 seconds. Place on paper towel. Repeat with rest of the
batter.
To freeze:
Make stack, place wax paper between each crepe, place in plastic bag. Freezes
well for up to 4 months. Thaw for one hour before using.
The author winter rafting on the Indian River courtesy of Big Bear Adventures.
Like to be outside but don’t want to peddle a fat bike up a snow-covered hill? Treetops offers horse-driven sleigh rides, and for serious foodies, there’s their Wilderness Sleigh Ride Dinners.
The sleigh rides at Thunder Bay Resort in Hillman, Michigan, includes elk-viewing at its Northern Elk preserve. The sleigh ride and five-course gourmet dinner option was named by both USA Today and Fox News Online as a “Top 10” event.
Thunder Bay Horse and Sleigh Ride
You’ll have to get up early, but it’s worth setting the alarm for the Sunrise Groomer Rides offered by several resorts including Treetops, Boyne Mountain and Boyne Highlands.
“The slopes don’t just magically appear each morning with fresh corduroy,” says Kevin McKinley, of Treetops Resort in Grayling, Michigan, noting there’s a lot of work that goes into well-groomed ski trails, and watching the experienced groomers go about their job is a great behind-the-scenes activity.
Really, all you have to do is bundle up and climb into a raft at Big Bear Adventures in Indian River, Michigan, for a trip down the fast-moving Sturgis River (a must for winter rafting as the rapidly flowing water keeps it from freezing and, thus, navigable).
“Chris Prysok, our guide, is very experienced; he’s a rafting guide in West Virginia and in the Apostle Islands,” says Patti Anderson, co-owner of Big Bear with her husband, Scott.
Boyne Highlands
“It’s a beautiful trip, and there’s lots of wildlife to see — deer, eagles, turkeys, muskrats and lots of birds.”
The winter rafting trip lasts 90 minutes. If you decide to add the 90-minute snow shoe or cross country package (with a break for hot chocolate) it’s no longer an armchair adventure but still lots of fun.
Call it pizza love. In 2017, according to PMQ Pizza Magazine, Americans consumed 45.1 billion dollars’ worth of pies. But what’s the best place for pizza? Steve Dolinsky, a James Beard award winning food writer known as the “Hungry Hound,” podcaster and food tour operator, decided to prove there’s no better place for pizza than Chicago, its suburbs and five collar counties.
He shares his results in Pizza City, USA: 101 Reasons Why Chicago Is America’s Greatest Pizza Town(Northwestern University Press 2018; $24.95), a user-friendly guide to all things dough, sauce and toppings divided into chapters on pizza categories:: Tavern-Style (Chicago-Style Thin), Thin, Artisan, Neapolitan, By-the-Slice (New York-Style), Deep-Dish and Pan, Stuffed, Sicilian, Roman and Detroit-Style and last, but not least, Overrated. Dolinsky than includes photos and information about each of the 101 places in the book as well as the five best in each category. Maps included show where the top pizza places are located in case you want to hit the road.
It was a
tough assignment and Dolinsky often ate pizza at three different places in a
day. In all he visited 185 locations (not all made the cut), consumed massive
doses of anti-acids, and, to keep his weight gain at a minimum, practiced
portion control and doing yoga sculpting daily.
Dolinsky’s inquisitiveness about Chicago food isn’t limited to pizza. He’d already written “The 31 Essential Italian Beef Joints in Chicago(land): for his Website stevedolinsky.com and also visited every place in the city that served Vietnamese pho so he was used to massive samplings of the city’s favorite foods, but he had other reasons as well.
“People
say Chicago has the best pizza, but I didn’t really think that anyone had done
any research on this scale, that there hadn’t been a deep dive into pizzas,” he
says, noting that he considered it an unparalleled lifetime quest in the city’s
illustration pizza history. “I didn’t realize how massive of an undertaking it
would be.”
Like any
scientific study, there were rules. Dolinsky created what he called the Optimal
Bite Ratio (QBR) with points given for crust, sauce and the quality of the
sausage and pepperoni as well as the application and mouthfeel of the cheeses.
Here’s
just a smattering of what Dolinsky learned. While most of the U.S. prefers
pepperoni as a topping, Chicago likes bulk sausage, which probably harkens back
to the days of the stockyards. Media outside of Chicago often confuses deep
crust pizza and stuffed pizza (the latter which Dolinsky mostly disdains). Deep
crust pizza, while one of Chicago’s wonderful inventions, is rarer than one
might think though outsiders think it’s the real Chicago thing. Notice how when
you travel, a Chicago-style pizza place means deep dish. but Dolinsky says it’s
the Tavern-Style or Chicago-Style Thin, square-cut pie that Chicagoans love—the
kind with middle pieces in the center with no crust handles that my brother and
I used to fight over when we were kids.
For those
who want the full-Dolinsky treatment, he also runs pizza walking tours starting
in May. The tours meet at Lou Malnati’s (1235 W. Randolph St.), a 7-minute
drive from The Loop and showcases four different styles of pizza. Highlights
include a traditional Chicago deep-dish, an only-in-Chicago Roman al taglio, a
classic Neapolitan and a Sicilian slice. Included in the tour price is a custom
souvenir lanyard and badge good for discounts and deals. For more information,
visit pizzacityusa.com
If you
can’t wait for a tour or to learn more, on Thursday, January 31 from 7:30-9:30
pm EST, Steve Dolinsky will be teaming up with the chefs from Pizzeria Bebu for
a pizza–making demonstrated, followed by a tasting. Steve then will give a
lively presentation on how he went about making the choices for the book.
Where: Read It & Eat, 2142 North Halsted St., Chicago, IL. For ticket prices and more information, (773) 661-6158; readitandeatstore.com
In the meantime, here’s a deep dish pizza recipe from Lou
Malnati’s Pizzeria, rated among the top by Dolinsky and a favorite in Chicago
for over 40 years.
The Malnati Classic
20 ounces pizza dough
Olive oil, for the pan
12 to 16 ounces mozzarella cheese, sliced
12 to 14 ounces 90-percent lean Italian sausage, casings removed
10 to 12 ounces seasoned Roma tomato sauce, maintaining chunks
2 to 3 ounces grated Parmesan
2 to 3 ounces grated Romano cheese
Special equipment: a round steel baking pan
Preheat the oven to 450 degrees F.
Allow about 20 ounces of your favorite yeast dough to rise. You may do
this if you have a proofer, or simply leave it at room temp for about 2 hours.
Oil a round steel baking pan with a few ounces of olive oil. Press the
dough on the bottom and to the sides of the pan, being careful not to tear it.
Holes in the dough will create a soggy crust. Pull the dough up the sides of
pan to 1 to 1 1/2 inches high.
Place the mozzarella evenly across the dough. Top with the sausage,
making sure to get the sausage all the way to the sides.
Cover with the seasoned tomato sauce, spreading evenly and maintaining
the chunks of tomatoes. Sprinkle with the Parmesan and then the Romano.
Bake until the crust and the grated cheese turn golden brown, and the
crust is firm yet flaky, 30 to 40 minutes.
Used to monitor number of Google Analytics server requests when using Google Tag Manager
1 minute
_gac_
Contains information related to marketing campaigns of the user. These are shared with Google AdWords / Google Ads when the Google Ads and Google Analytics accounts are linked together.
90 days
__utma
ID used to identify users and sessions
2 years after last activity
__utmt
Used to monitor number of Google Analytics server requests
10 minutes
__utmb
Used to distinguish new sessions and visits. This cookie is set when the GA.js javascript library is loaded and there is no existing __utmb cookie. The cookie is updated every time data is sent to the Google Analytics server.
30 minutes after last activity
__utmc
Used only with old Urchin versions of Google Analytics and not with GA.js. Was used to distinguish between new sessions and visits at the end of a session.
End of session (browser)
__utmz
Contains information about the traffic source or campaign that directed user to the website. The cookie is set when the GA.js javascript is loaded and updated when data is sent to the Google Anaytics server
6 months after last activity
__utmv
Contains custom information set by the web developer via the _setCustomVar method in Google Analytics. This cookie is updated every time new data is sent to the Google Analytics server.
2 years after last activity
__utmx
Used to determine whether a user is included in an A / B or Multivariate test.
18 months
_ga
ID used to identify users
2 years
_gali
Used by Google Analytics to determine which links on a page are being clicked
30 seconds
_ga_
ID used to identify users
2 years
_gid
ID used to identify users for 24 hours after last activity